Click HERE to find a Training Video on this subject.
The Punch Report gives you a detailed overview of the gate log activities for the employees within a given date range. It allows you to easily view the different times employees badge in and out, and helps to calculate time on site, time off site, lunch deductions and durations, etc.
To run a punch report, click the ‘people’ icon on the main screen.

Alternatively, you can click Reports > Labor > Time and Attendance > Punch Reports.
This interface has four (4) sections: “Filters”, “Additional Filters”, “Calculation” and “Display Options".
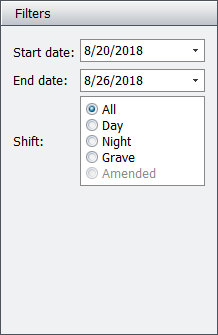
The “Filters” section governs what date and shift will be included in the punch report and will only include punch records that fall within the specified date range and shift. For example, if an employee works on night shift and you select the correct date range but select "Day" in the "Shift" box, then that employee’s punch details will not be included in the punch report since the incorrect shift was specified.
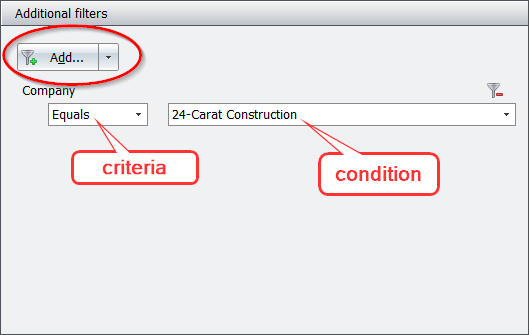
The “Additional Filters” section is a dropdown list that limits what data is loaded and presented in the report. Just click “Add” to add a new filter, then specify the criteria and condition for each filter. Here you can set limits for company, classification, employee, badge number, day, etc.
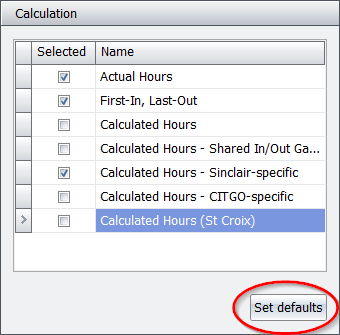
The “Calculation” section determines what calculation columns are included in the body of the report. Each checkbox serves as a new column in the punch report; however, you are limited to a maximum of three (3) fields. You can refer to the Punch Report Calculation article when deciding on what calculations to use as the rules are different for each calculation field. The "Set defaults" button stores the applied settings for future uses and is most advantageous when it comes in effect after setting up the “Calculation” and “Display Options” sections (to follow), so all changes and settings can be incorporated.
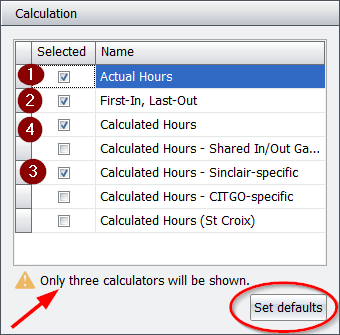
If you select more than three calculation fields, you will receive a warning that “Only three calculators will be shown”, usually the first three in the list and not necessarily the first three selected. In this example, even though "Calculated Hours" is the fourth box to be checked, it will still get priority over "Calculated Hours - Sinclair-specific" since it is ranked higher in the list of calculators.
The “Display Options” section outlines how the details are displayed in the punch report and what details are included, depending on the selected checkboxes.
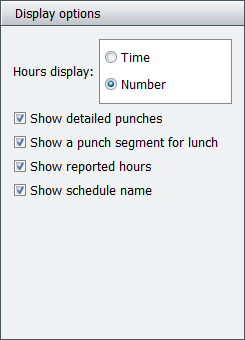
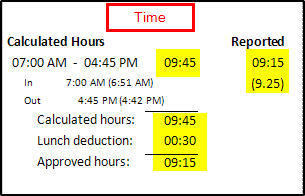
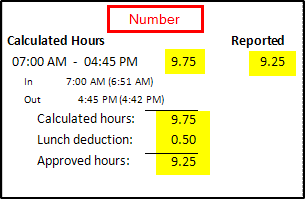
The “Hours display:” box, lets you choose between “Time” (to show 09:15 for 9 hour and 15 mins) and “Number” (to show 9.25 for 9 hour and 15 mins).
Sample with “Time” selected:
Sample with "Number" selected:
The "Show detailed punches" checkbox gives a brief description of the different activities on the punch report. It tells you whether a punch is an 'in' or 'out' punch. It also displays the actual time next to the calculated time when rounding occurs.
Sample with "Show detailed punches" selected:

Sample with "Show detailed punches" left unchecked:

The "Show a segment for lunch" checkbox includes a note for lunch in the report. It shows the time off site (i.e. 12:00 - 12:30) as its own group in the calculation.
Sample with "Show a segment for lunch" selected:

Sample with "Show a segment for lunch" left unchecked:

The "Show reported hours" checkbox lets you decide on whether to show hours reported by the contractor, on the punch report. If left unchecked, the reported hours will be omitted from the report. Reported hours with an asterisk indicate that the reported hour is greater than the approved hours (after all deductions, rounding, etc., are calculated).

The "Show schedule name" checkbox lets you decide whether to include the schedule name in the punch report. It is displayed immediately below the employee name and is useful when tracking what schedule each employee is on. If left unchecked, the schedule name will be omitted from the report.

After deciding what display options to use in the punch report, and before previewing the punch report, if you'd like to use those settings in the future, click “Set defaults” (mentioned above) to store them. Afterwards, proceed to preview the punch report or export the punch data.
Previewing Punch Reports
To preview a punch report click “Preview” in the lower left corner of the screen.
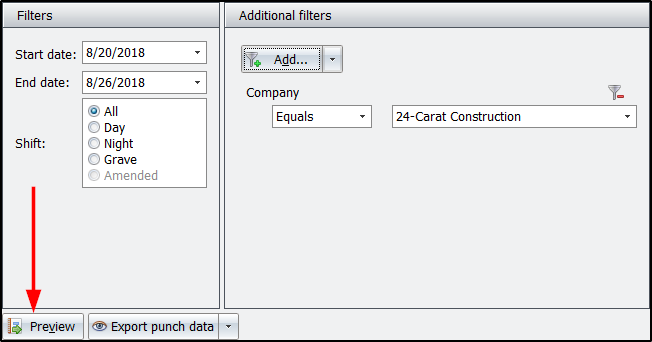
The will load the punch report, and includes details such as company, employee name, employee number, classification, date, schedule, and the different activities in the punch calculation columns. Please note that the employee number displayed is the CT2 # (system generated), and may differ from the company #, if one has been assigned to the employee.
Also note that the punch report may show records for employees with reported times but no gate records. These are generally accompanied with notes, for validation.
Parameters and Document Map
To the left of the report you will find a “Parameters” and “Document Map” pane.
The “Parameters” pane has a list of criteria to further explore the loaded punch records. For example, if you’d like the report to only show those who’ve arrived late just select the corresponding checkbox and click “Submit.” Click on “Reset” to clear the selection(s) for the checkboxes.
The “Document Map” pane serves as a bookmark, and lets you expand/contract the list of items displayed, while seamlessly jumping from one item to the other, instead of having to scroll up/down the report.
Exporting Punch Data
To export punch data click the “Export punch data” dropdown in the lower left corner of the screen.
Afterwards, select what data you’d like to export and set the destination to save the csv file. Please note that the columns displayed in the exported file vary based on the item selected from the dropdown.