The report generator serves as a utility to combine several reports into a report set and makes it easy to amalgamate and run report types and reports from different report sets. This article will explore different settings and components of the report generator.
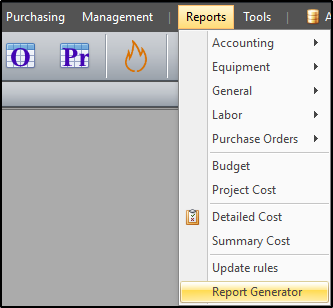
To create report sets using the Report Generator click Reports > Report Generator.
Report Set Commands
At the outset, click on "New" to add a new report generator set.
![]()
Add a title for the new report generator set, then click "OK" to save it.

After saving the report generator set, click the "Report set:" dropdown and select the one you'd like to use or modify. You will observe that the report generator comes with the “_AuthorizationPackage” and “_BillingPackage” report sets loaded by default. They govern what reports form part of the authorization package and billing package reports, respectively. You will also observe that you can also rename, delete or duplicate the selected report set.

This interface is divided into five (5) sections (settings, base filter, reports, outputs and options) that collectively affect the reports you run and export. Let's explore each section in greater details.
Settings
The “Settings” section lets you decide where to save reports and database files for the selected report set.
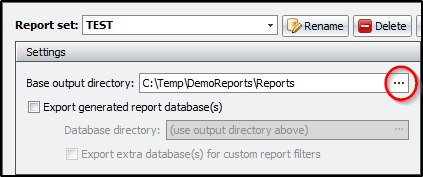
You have the option to set a “Base output directory” by clicking on the ellipsis (…) then mapping the output folder. This setting will apply to all reports in the report set; however, it can be overridden for individual reports in the “Outputs” section to be discussed later. If you hover over the ellipsis (…), you will find variables that can execute specific commands for a report or report set. Just type the desired command in the textbox to add that variable to the report set and a separate folder will be created in the output folder with the details for the variable.
To demonstrate, if you'd like to have dated folders as your base output directory you could add %EndDate!MMMM d yyyy% to the defined the path, and each time you run the report set a new, dated folder will be created. The full path directory would look like this: C:\Temp\DemoReports\Reports\%EndDate!MMMM d yyyy%
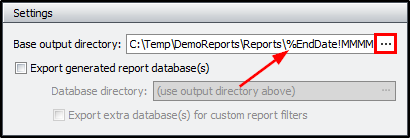
To keep things simple, we will not be storing the variables in our base output directory.
The export generated database(s) checkbox is unchecked by default. This option exports SDF files along with the exported reports in the report set. These standard database files store data in a structured file format and are often used to transfer data between different database applications. Please leave unchecked if you are not taking advantage of its features. If you choose to flag the export generated database(s) checkbox, you can further calibrate the output folder for the database directory or choose to export extra database(s) for custom report filters ("Reports" section > "Report filter" column).
Base Filter
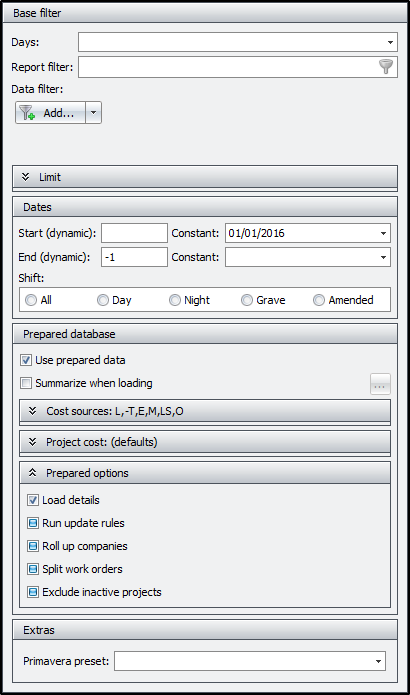
The “Base Filter” section serves as a global filter for all the reports in the report set. This is where you'd choose days, report filters, data filers, limits, dates, prepared database filters and extras for all reports in the report set. We will explore each in greater detail below.
Days
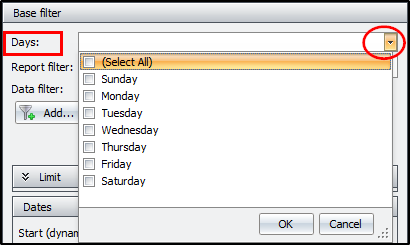
The "Days" filter includes checkboxes for each day of the week and lets you filter for one or several days concurrently. If a day is specified, reports will only include data for those days for the date range below.
Report Filter
The "Report filter" serves as a query builder that lets you build your filters with multiple conditions and groups.
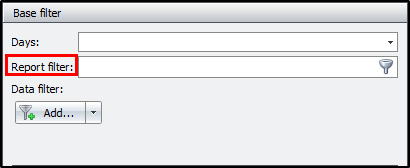
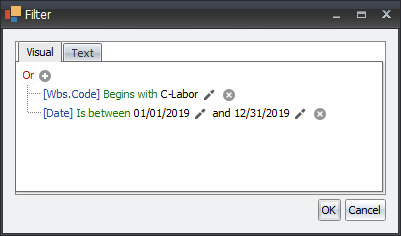
Please note that this filter is unavailable when different report kinds are used. For example, if your list of report has "EntrySummary", "ProjectCost" and "EntryCostSummary" reports in the list, the "Report filter" option will be grayed out, thus unmodifiable. Otherwise, just click on the 'funnel' icon then add your filters using the "Visual" or "Text" option.
Sample using "Visual":
Sample using "Text":
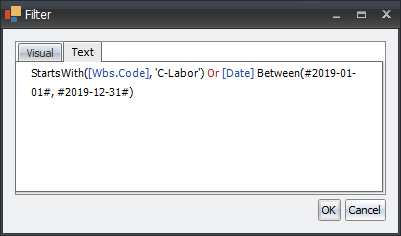
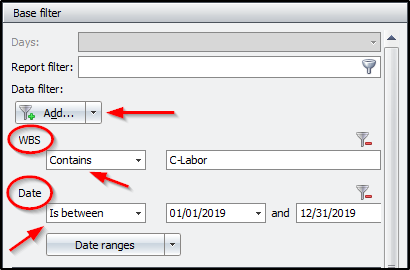
The data filter is a dropdown similar to the above but as a dropdown. Just click "Add" and select the filter(s) from the list, then specify a condition for each. This sample is similar to the two (2) preceding samples (using WBS and Date).
Limit
The "Limit" section also curtails what data gets loaded and only show data on the items that are set as limits.
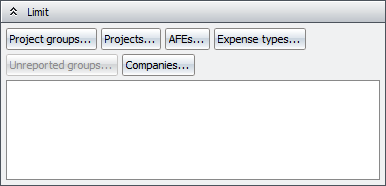
When setting limits, click on the source (i.e. "Companies") then select the item from the "Only" dropdown. Afterwards, click the append button to add a limit and the remove button to delete a limit.
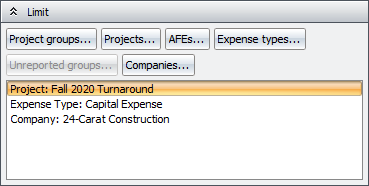
This example has limits set on project, expense type aand company.
Dates
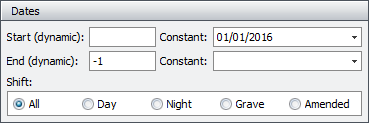
In the “Date” section you can enter dates as constant or dynamic values. Dynamic dates are relative values (i.e. in relation to the current date) and are good for ongoing projects, but can also serve as a quick shortcut to calculate the number of days between given dates. For example, if you want your end date to be yesterday type "-1" in the “End (dynamic)” field. See the Dynamic Dates article for more details. Constant dates are absolute values (i.e. 01/01/2016) and are good for projects that have already ended or if you have specific start and end dates for the report set. You can also set the shift you'd like to filter to, for each report set. This example uses a constant start date, a dynamic end date and includes all shifts.
Prepared Database
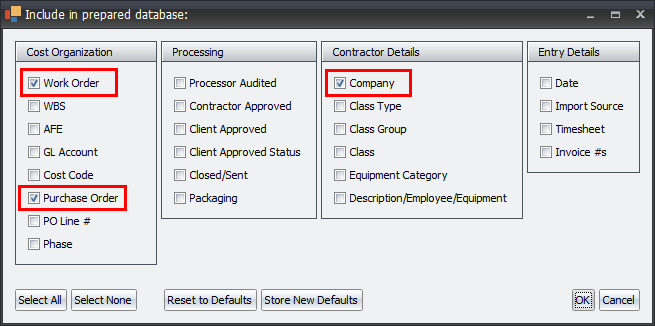
The “Prepared Database” section serves as a global filter that ultimately defines what data is loaded into the prepared database. In this section you can flag whether to use prepared data and also summarize the data when loading it. The "Summarize when loading" option has a popup screen to determine the (site-configurable) level of detail (work order, PO, class, class type, class group, employee, etc.) to include in the prepared database. This feature allows for running reports on larger data sets while choosing the level of detail included. If you’re looking to compile multiple years of data or a very large data set, this could make your report take much less time to generate, while avoiding issues with database or summary temp limit. To select what data to summarize by, flag the "Summarize when loading" checkbox then click on the ellipsis (...) to open the form make your selection.
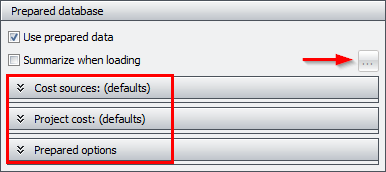
In this example the records loaded in the prepared databases will be summarized by WO, PO, and Company. No extra data will be loaded for approvals, classifications, employees, or even work dates.
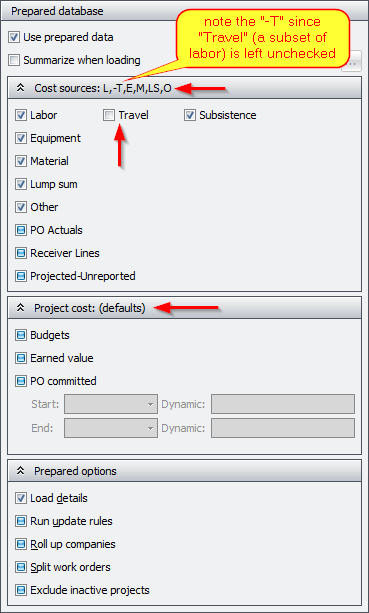
The three “Prepared Database” subsets are all collapsed by default, each having several tri-state checkboxes for further data calibration. They are either 'unknown' (run with the default settings), 'unchecked' (omit from data set), or 'checked' (include in data set). If a subset is left untouched, "(defaults)" will be displayed beside the title to highlight that no change took place. However, when changes are made within a subset, an abbreviated list will be shown beside the title.
This example has modifications in the "Cost sources" section, however, the "Project cost" section was left untouched.
After setting up the prepared database, if you need to apply additional filters to a given report you can do so using the “Report Filter” in the “Reports” section.
Extras
The “Extras” section handles details related to Primavera presets. Just click the Primavera preset dropdown and select the preset one you'd like to use. Otherwise, leave that section blank.
Reports
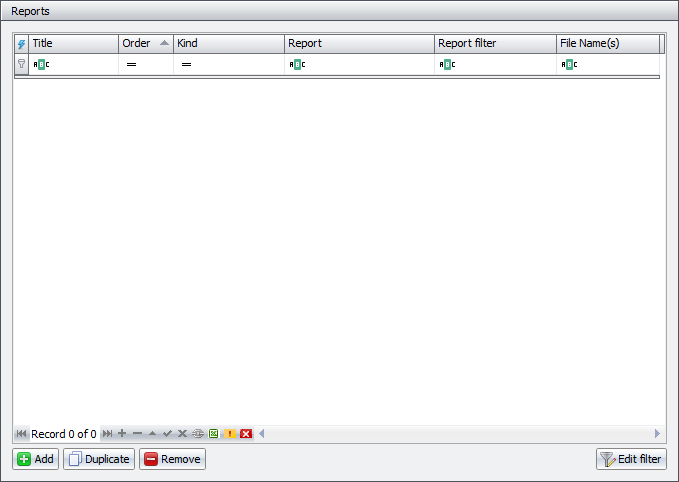
The “Reports” section lets you add and modify a wide array of reports from the different report screens in the software. Here you can modify the titles, display order and report filters for select reports. Use the "Add", "Duplicate" and "Remove" buttons to add, duplicate and remove selected reports, respectively.
After click "Add", select a report from the report selection dialog. Here the Report screen dropdown serve as the gateway to the different report in the software.
NOTE: Be careful when adding “User customizations” reports to your report set as other users (including you, when logged in on a different PC) will encounter errors when running that report set. As such "Site customizations" reports are recommendable in this case.
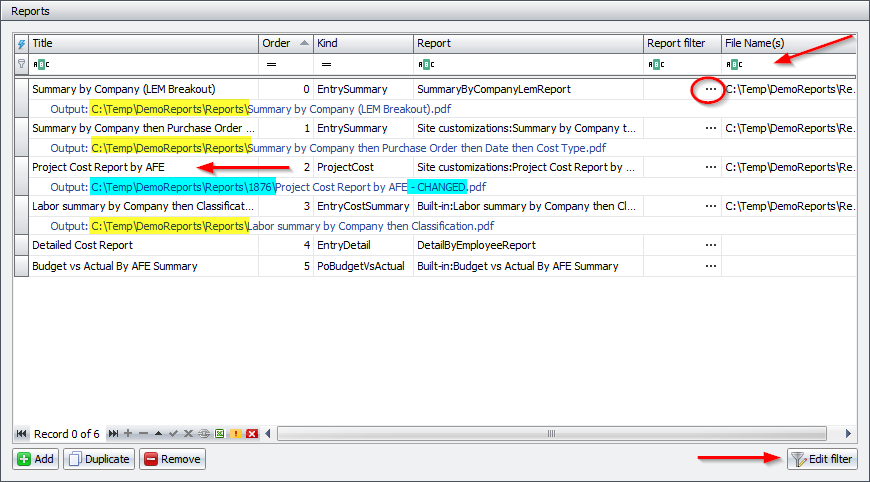
Each newly added report will fall in sequential order. However, you can rearrange them afterwards by changing the numeric values in the “Order” column. You can also set additional filters for the selected report by clicking on the ellipsis (…) in the “Report Filter” column (circled) or the "Edit filter" button in the lower right corner of this section.
PLEASE NOTE: While it may be tempting to search for a report using the filter row in the "Title" or "Report" columns, respectively, it is recommendable to do so using the filter row in the “File Name(s)” column instead. This is because the “File Name(s)” column accommodates changes made to the file name in the “Outputs” section below, and the others do not. For example the file name highlighted in blue has been modified, so if you typed "changed" in the aforementioned filter rows, to pinpoint that report/file, only the “File Name(s)” column would locate that report/file.
Outputs
In the “Outputs” section you can set what the file type, destination folder, and file name for the selected report. A “Type” must be set for each report that you'd like to produce an output item for. Otherwise that report will only form part of the merged reports after you run a report set and click “Preview merged report” (to be discussed later). Additionally, if none of the reports in the report set has an output file type, then when you choose to run the report set, it will go straight to a merged report. Using the screenshot above, no output file will be created for the last two (2) reports in the list.
The “Directory” column lets you set a specific output folder for the selected report. In this case, if a “Base Output Directory" (described earlier in the "Settings" section) is already established, then the output folder will be saved as a sub-folder to that folder. This is also highlighted in blue in the screenshot above.
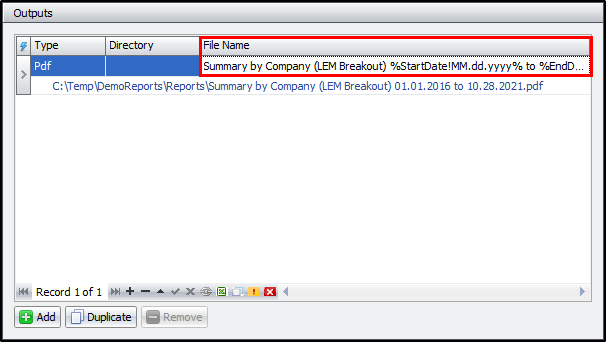
The "File Name" column lets you set a specific file name for the selected report, which basically overrides the report title with the new file name. If no file name is set, then the report title will be used.
To add more context, from the variables mentioned in the "Settings" section above, you can also apply similar settings to create dated files in the "Outputs" box. This example shows a start date and end date for to the selected report when adding %StartDate!MM.dd.yyyy% to %EndDate!MM.dd.yyyy%.pdf to the file name. The complete file name would look like this: Summary by Company (LEM Breakout) %StartDate!MM.dd.yyyy% to %EndDate!MM.dd.yyyy%.pdf and also displays the full output path for the file below.
This is also only for demonstrative purposes. Feel free to explore the other options at your convenience.
Options
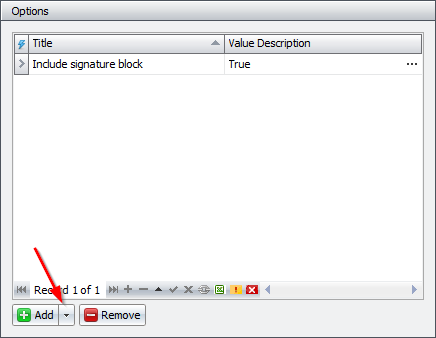
The "Options" section is very scarcely used, however, it handles settings for certain reports. It includes a "Title" that tells you what the option for the selected report is, and a "Value Description" that denotes what action will take place. Depending on the selected report, the actions for the "Value Description" may be displayed in xml data form or on a pop up form. In this example, you can set whether or not you'd like to include the signature block on a detailed cost report by typing "True" or "False" in the "Value Description" column.
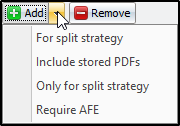
It is also important to note that the "Add" button is also a dropdown that lets you pick from pre-defined options available for the selected report.
Running Report Sets
The last set of commands in the "Report Generator" screen is the "Run report set" dropdown located in the upper right corner of the interface. This button lets you preview the reports and create output files for each. Here you can choose between:
- (i) Run
- (ii) Run relative to date…
- (iii) Run with custom filter/relative date
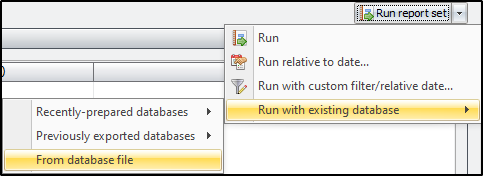
- (iv) Run with existing database (then select which prepared database to use).
Run
Clicking on "Run" will simply run the report generator set, without making any or additional or special settings.
Run Relative to Date
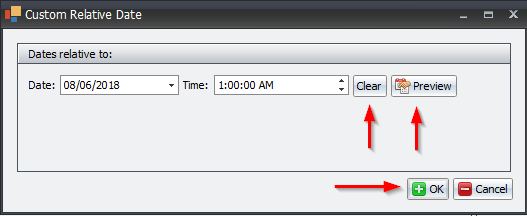
Clicking on "Run relative to date" lets you run the report set with respect to a given date. In this case, the custom relative date form will pop up for you you set the new effective end date. Here, you can click "Clear" to reset the date and time editors, and "Preview" to see the original and new effective dates are. Lastly, click on "OK" to run the report set, relative to the prescribed date.
Run with Custom Filter/Relative Date
Clicking on "Run with custom filter/relative date" lets you run the report set with custom filters, with respect to a prescribed date.
Run with Existing Database
There are three ways to report sets with existing databases.
(i) You can do so with a recently prepared database that is created on any of the "Reports" screens. For example, if you created a prepared database in the "Detailed Cost Report" screen, all you'd have to do is note the time it was creating and select it here.

(ii) You can do so with a previously exported database from any of the "Reports" screens. For example, if you flagged the "Export generated report database(s)" checkbox in the "Settings" section of the report generator, those exported databases will be available for selection here.

(iii) You can do so from a database file, saved anywhere on the computer. This includes but not limited to files that are used in to the two (2) aforementioned examples.
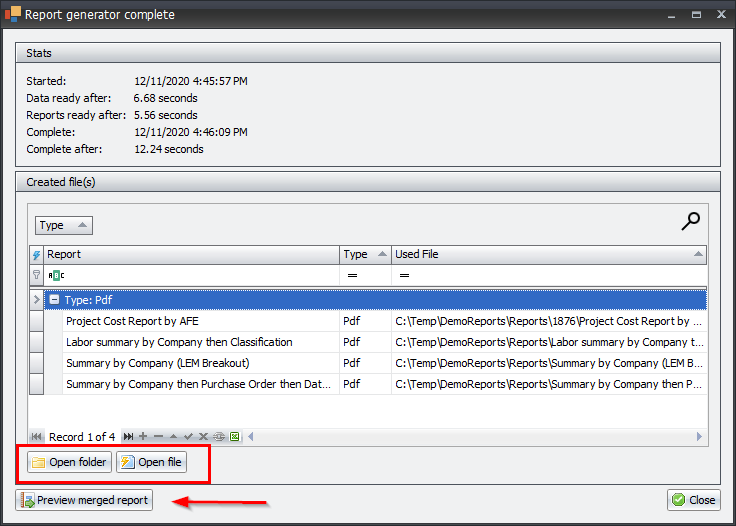
Upon successfully running your report set, you will receive a confirmation with the details on the report set. It will give a brief "Stats" overview, list the created files and let you select a file and choose between opening the file or the folder containing the file. You can also preview merged reports for those reports with no defined output files.
This concludes the different activities in the report generator screen.
