Schedules are created and assigned to employees to keep tabs on attendance, punctuality and monitor productivity. While these schedules may have similarities, to an extent, they also have distinct characteristics that affect how variables like calculated hours, reported hours, lunch intervals, etc., are displayed on punch reports. This article will explore setting up schedules, assigning default schedules and other tasks that can be performed in this window.
Adding Schedules
To create or modify a schedule click Labor > Schedules.
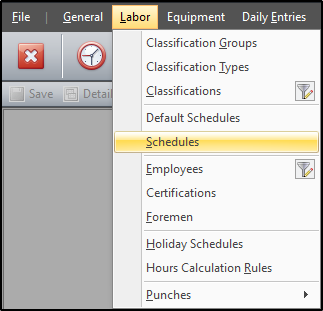
From there, click append (+) on the record navigator to add a new row, then add the details for the selected schedule in the grid or the panels below.
Basics
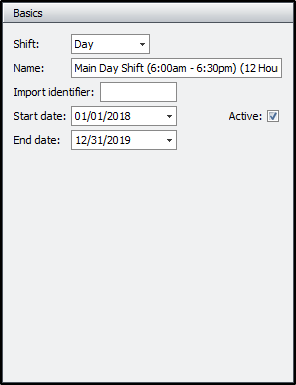
The fields in the "Basics" section helps to differentiate one schedule from another. This is where you'd assign the shift as well as specify the name for each schedule. The import identifier is the code added or imported from an external source with predefined settings for the selected schedule. If it is not known, please leave the field blank. The start date and end date fields define the period that the schedule is in effect. When start dates and end dates are set, punch records that fall outside these dates will use the default schedules instead. For example, if the start date is 01/01/2018 and the end date is 12/31/2019, punch records in 2017 (and before), or 2020 (and after) will use the default schedule and not the selected schedule since the dates are out of bounds. The last item in the "Basics" section is the active checkbox, which is flagged by default and makes the schedule available for selection and assignment in the "Employees" menu. Inactive schedules are grayed out in the grid, and are not available for selection/assignment elsewhere.
Times
The “Times” section basically governs the boundaries and limitations for each schedule. For that reason, this is where you'd define when the shift starts and when the shift ends. Furthermore, the three checkboxes serve as channels to more accurately or robustly calculate punch reports. The depictions below will assume that only one checkbox is flagged for each scenario. Feel free to use any combination you'd like.
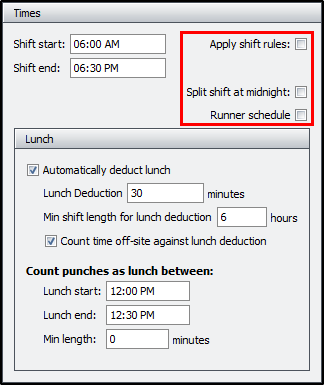
When the "Apply shift rules" checkbox is flagged, the calculated hours for all employees assigned to the schedule will have their first 'in' punch rounded to when the shift starts if they badge in before that time, and their last 'out' punch rounded to when the shift ends if they badge out after that time. In this case, an employee who badges in at 5:52 AM and out at 6:37 PM will have their calculated hours reflect 6:00 AM and 6:30 PM respectively as they're bounded by the prescribed times when the shift starts and ends.
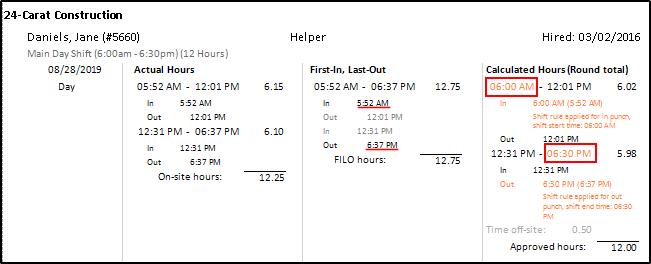
Note that a lunch window must be set and utilized or there will be an additional deduction for lunch when calculating time off site.
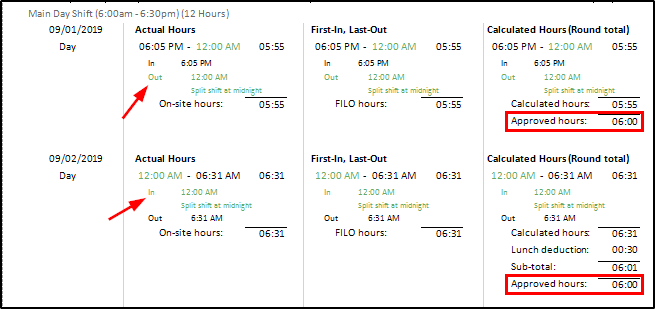
The "Split shift at midnight" checkbox is only available for day shift schedules. When used, if a shift extends beyond midnight, then on punch reports an out punch is added to end the day at midnight, and an in punch is added to start the next day. This is used most often by security companies, who report hours separately for each date when a shift spans multiple calendar dates. In this example, the employee badged in at 06:05 PM and badged out at 06:31 AM. As such, his 12-hour shift was broken into two 6-hour shifts - one for each calendar date.
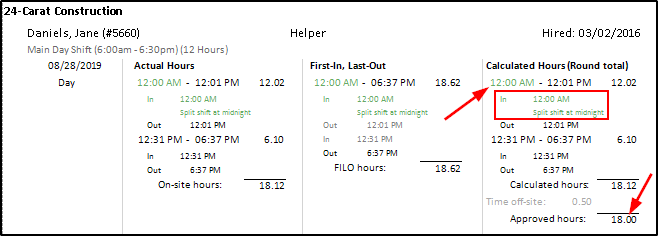
Additionally, when "Split shift at midnight" is flagged, it adds an 'in' punch at midnight if the first punch is not in, and an 'out' punch at midnight if the last punch is not out. For example, if an employee forgets to badge in at 5:52 AM, his first punch will display as 12:00 AM on that day.
Conversely, if he forgets to badge out at 6:37 PM, his last punch will display as 12:00 AM on the following day.
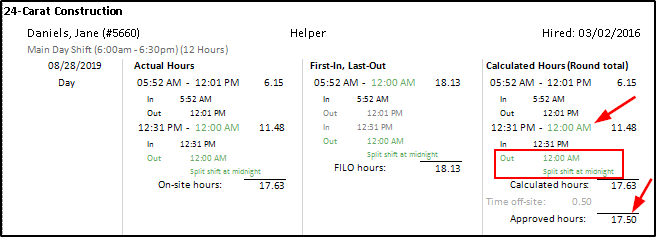
Note that the approved hours are well above the actual 12 hours, so be mindful when choosing to split shift at midnight, as it will increase the calculated and approved hours significantly if the employee forgets to badge in/out when the shift starts/ends.
The "Runner schedule" option also has its own rules and logic. When it is flagged, only the first 'in' punch and the last 'out' punch are used to calculate approved hours. All other punch records between the first-in and last-out, are ignored when calculating approved hours. There will also be a warning on the schedule that lunch start and lunch end values will be ignored because this is a runner schedule.

Lunch
The "Lunch" section, a subset of the "Time" panel, governs the boundaries for how punch records are calculated during the window allotted for lunch break.
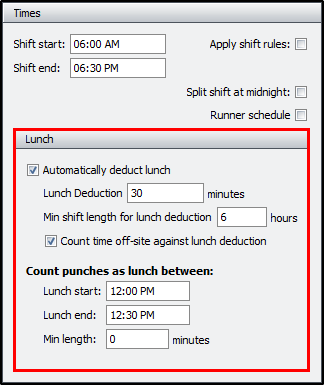
This is where you decide whether or not lunch is automatically deducted and how many minutes to allocate for lunch deductions. By the same token, you can set a minimum time on site before automatic lunch deductions take place, and flag if time off site should be counted against lunch deduction.
With the auto-deduction flagged, if the total time off-site is less than the lunch deduction (30 minutes), only the difference is added as a lunch deduction. In this example, since total time off site was 0.28 hour or 17 minutes, then a lunch deduction for 0.22 hour or 13 minutes was included to make up the difference.
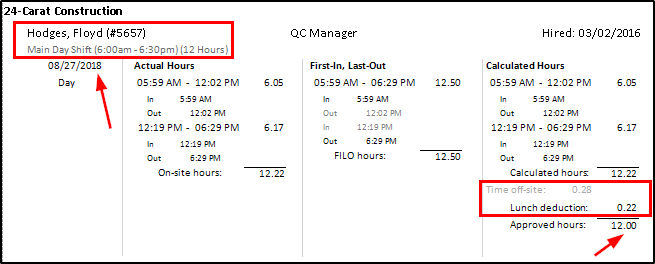
When the auto-deduction not flagged, time off-site is calculated as is.
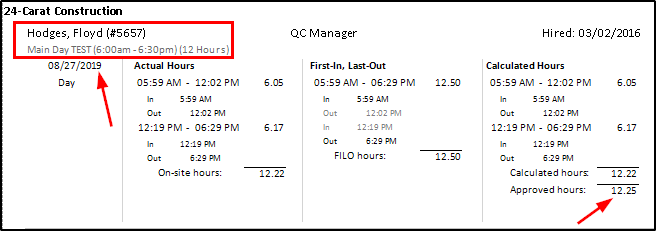
In addition to the above, you can also set the timespan that will serve as the lunch window and decide when lunch starts, when lunch ends, and the minimum (off-site) time to count as lunch, This example has zero (0) minutes set, therefore, all time off site between 12:00 PM and 12:30 PM will count as lunch. If you set that to “20”, then it would only count as a lunch if the employee is off-site for more than 20 minutes between an 'out' and an 'in' punch. Also, when shift rules are applied, then a lunch would have to be both during the lunch window and clocked out for at least that “Min length” to count toward the lunch deduction.
Rounding
The "Rounding" section determines how calculated hours are rounded for each punch report calculator. Depending on the calculator being used, rounding will be applied to every punch, or the total calculated hours. The "Round to nearest" dropdown lets you choose between rounding to the nearest half hour, quarter hour, tenth of an hour, or no rounding when calculating approved hours. In addition to that, the "Seconds" dropdown lets you choose between two options. You can either remove seconds from time altogether (i.e. recognize 06:05:02 AM and 06:05:47 AM as 06:05) or round seconds to the nearest minute (i.e. recognize 06:05:02 AM as 06:05 AM and 06:05:47 AM as 06:06 AM).
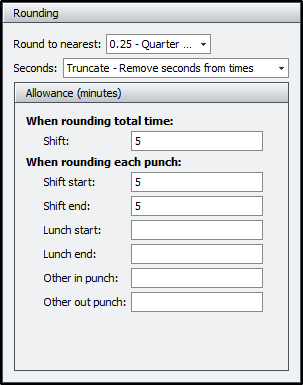
Allowance
The "Allowance" section, a subset of the "Rounding" panel, handles leeway for punctuality and the grace period in place before docking takes place.
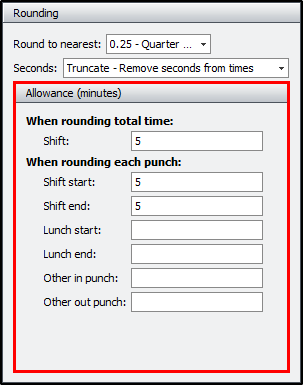
The first field deals with rounding total time for each shift. In this example, a 5-minute rounding is set, which mean total hours will only round up to the nearest quarter hour if the difference is five (5) minutes or less. Therefore, 10 hours and 6 minutes will be rounded down to a total of 10 hours, since it is not within the 5-minute window of 10 hours and 10 minutes (up to 10:14).
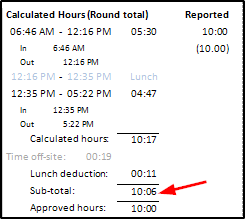
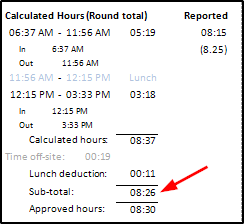
Conversely, 8 hours and 26 minutes will be rounded up to total of 8 hours and 30 minutes, since it is within the 5-minute window of 8 hours and 25 minutes (up to 08:29). Everything below 8 hours and 25 minutes but above 8 hours and 15 minutes will be rounded down to 8 hours and 15 minutes.
The shift start and field determines the 'grace period' for late arrivals. This example has a 5-minute grace period. Therefore, if and the employee badges in at 6:04 AM, then his approved hours will not get docked. However, if he badges in at 6:08 AM instead (after the 5-minute grace period), then his 'in' punch at the start of the shift will be rounded up to 6:15 AM since he is late. Conversely, the shift end field determines the 'grace period' for early departures. If the schedules ends at 6:30 PM and the employee departs at 6:27 PM, then his approved hours will not get docked. However, if the employee departs at 6:24 PM (before the 5-minute grace period), then his 'out' punch at the end of the shift will be rounded down to 6:15 PM since he departed early.
The lunch start and lunch end fields regulate tardiness around lunch. For example, if lunch starts at 12:00 PM with a 5-minute grace period and the employee departs for lunch at 11:49 AM; his 'out' punch will be rounded to 11:45 AM instead. Alternately, if lunch ends at 12:30 PM with a 5-minute grace period and the employee returns from lunch at 12:38 PM, his 'in' punch will be rounded to 12:45 PM.
The other in punch and other out punch fields are special circumstances for punches that are not shift start, shift end, lunch start, or lunch end.
Default Schedules
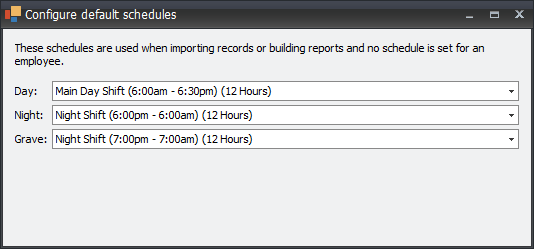
Default schedules basically serve as backup/alternate schedules that are used when importing records or building reports and no schedule is set for an employee. These schedules (day/night/grave) must be created in advance before they can be assigned as default schedules.
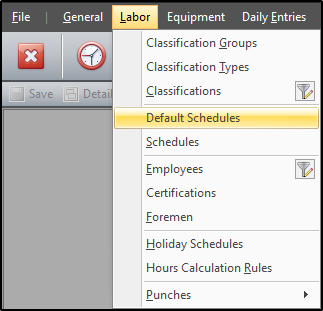
To assign default schedules click Labor > Default Schedules.
Click the dropdown for each schedule and assign a schedule from the list of schedules, then click "Save" to accept changes.
This concludes setting up schedules and default schedules.
