The "Equipment" menu serves as a platform to manage and track contractor equipment items, usually on a best-pricing basis. This article explores the range of activities that can be performed in this window.
This is one of several windows that can be pre-filtered, to limit what data is loaded when exploring equipment. For example, if you only want to load active equipment for a given company:
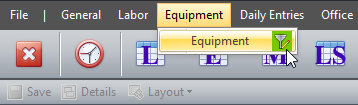
Click the filter icon at Equipment > Equipment.
Click the "Add" dropdown and select the "Company" filter, then load the satisfying records. The "Only active records" checkbox is flagged by default to only load active records. Uncheck it if you'd like to load inactive records as well.

Let's explore some other features in this window.
Adding Equipment
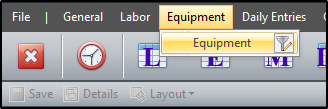
To add an equipment click Equipment > Equipment.
Click append (+) to add a new row, then enter the details for each record. You can also use the buttons to the right of the append button to modify or delete the selected record(s).

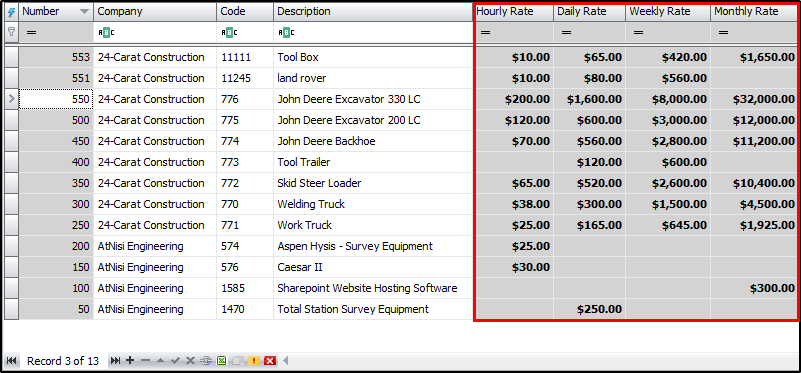
After adding a new row, you can fill the details for each record in the grid or in the tabs below the grid. You will observe that some columns in the grid are grayed out, as they're read-only and cannot be modified in the grid, as the data feeds from different menus or tabs in the software. In this example, the rates are populated from the "Rates" tab.
After adding and editing records, click on “Save” to accept changes as the data is not automatically saved after records are added, modified or deleted.
Upon saving, a Sys # (distinct system-generated number) will be assigned to each item.
Data Grid
One of the advantages to making changes in the grid is that you can apply the same change to multiple records simultaneously. After selecting the desired records, make the change in one of the selected cells then press tab and that change will take effect for all selected rows in that column.
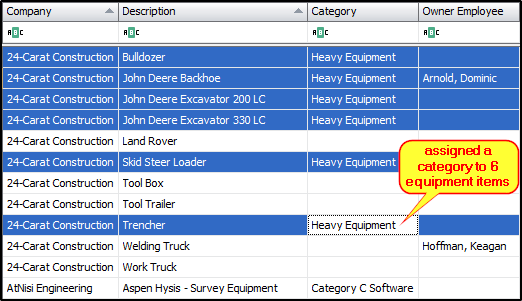
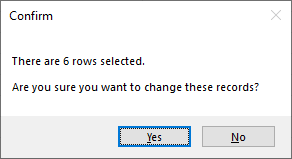
You will be prompted to confirm changes that affect more than five (5) records at a time.
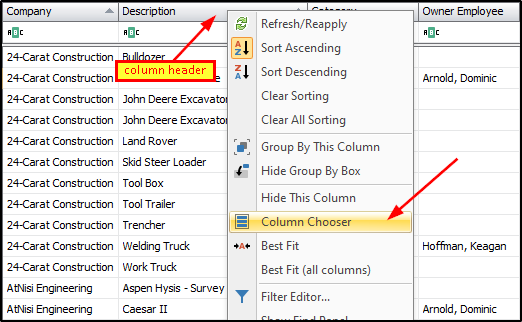
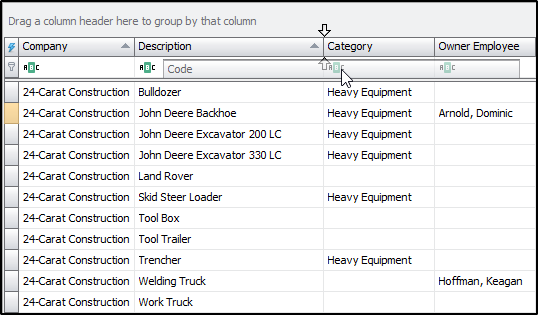
Some columns in the grid may not be visible, but can be retrieved from the column chooser, which basically houses the hidden columns. To retrieve a hidden column, right-click a column header and select "Column Chooser" from the context menu.
This will open the "Customization" form with the list of available columns for that screen.
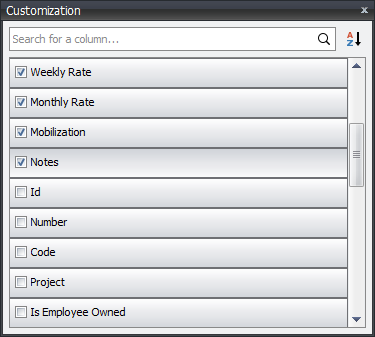
From there, drag and place the desired column from the form, to the grid. The two arrows facing each other indicate where the column header will be placed in the grid. In this example, the code column is being placed between the description and the category columns. See the data grids article for more in-depth details on data grids.
The tabs below the grid have a wide array of cells to add supplementary details to a record, but only allow modifying one record at a time. In some instances, if multiple records are selected in the grid then the tabs will be grayed out, thus, unmodifiable. For each cell, you can either type the details in the textbox, or select an available item from the dropdown list. Let's dive a little further in each tab.
Overview Tab
The “Overview” tab has a section for "Equipment" and one for "Owner". The "Equipment" section contains distinct details about each equipment item. It includes a Sys # (read-only, system-generated number) and/or a code (number assigned) for each equipment. The description field is used to name each equipment item. Additionally, the category and type fields are used to group equipment into different classes, for reporting purposes. This section also has two (2) checkboxes that lets the user flag the equipment as active or inactive, and to optionally tick treat as material where applicable. When "Treat as material" is flagged, the affiliated charges for that equipment will show up in the "Materials" section/column on reports.
The "Equipment" section also has a box for cost information for each equipment item. The SAP service master is used to link an equipment item to a set of rates in SAP. The Cost and Retail Price fields are sometimes used when wanting to compare the cost of renting over time to the cost of purchase.
The “Notes” tab, though seldomly used, lets you add notes for each equipment.
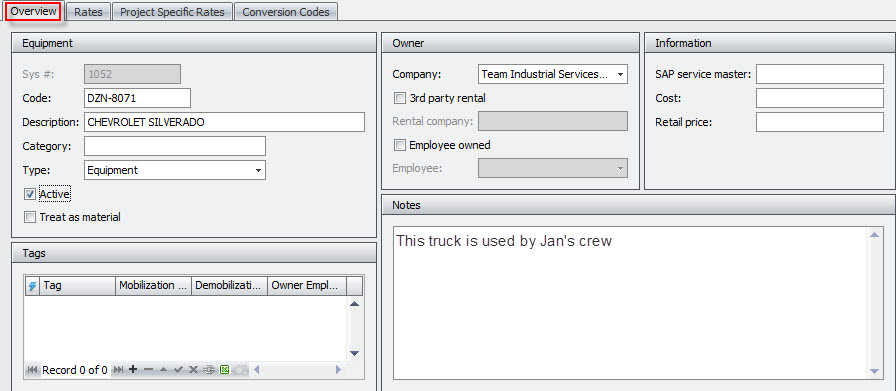
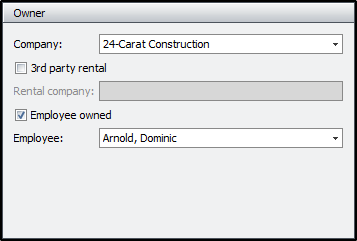
The "Owner" section lets you decide if the equipment is company-owned, a third-party rental, or employee-owned. If it is owned by a contractor, use the company dropdown to assign it to that contractor. If it is a third-party rental, first select the contractor, then tick the 3rd party rental checkbox and add the details for the rental company. If it is owned by one of the contractor's employees, first select the contractor, then tick the employee owned checkbox, and then assign it to the employee. The owner assignment will determine what cost source the affiliated charges for that equipment will show up as. Since this example is employee-owned, the charges will show up in the "Labor" section/column on reports and will be grouped with other charges for Dominic Arnold.
Rates Tab
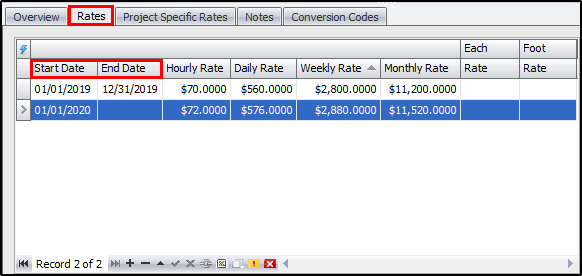
The “Rates” tab handles periodic rates (hourly, daily, weekly, etc.) and unit-based rates (each, foot, etc.) for each item. While most of the fields here are self-explanatory, it is import to note the impact of the start date and end date fields, as they define when rates are in effect.
- If the start date and end date fields are blank (usually there is only a single row with rates), then all daily entries for that equipment, will use the prescribed rates, since they're not bounded to specified dates.
- When a start date is defined, all daily entries before that date will have zero (0) rates, unless a new row is added for that date range or the current date range is expanded to facilitate said date range. In this example, since the earliest start date is 01/01/2019, all daily entries prior to that date will have zero (0) rates.
- Similarly, when an end date is defined, all daily entries after that date will have zero (0) rates, unless a new row is added for future date ranges or the current date range is expanded to facilitate those records. To illustrate, if an end date was set in the second row for 12/31/2020, all daily entries after that date would have zero (0) rates.
- This screenshot has the end date in the second row deliberately left blank. In such case, all daily entries after 01/01/2020 will use the prescribed rate, until an end date is defined.
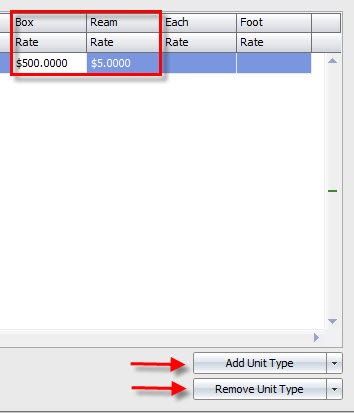
To the lower right of the rates are fields there are buttons to add unit rates and remove unit rates. Click "Add Unit Rate" to add a new unit rate and fill the details for unit and rate. This example has 2 fields added, one for Box and another for Ream. Conversely, use the "Remove Unit Rate" dropdown to delete a newly added unit rate. This button is only available when new unit rate fields are added.
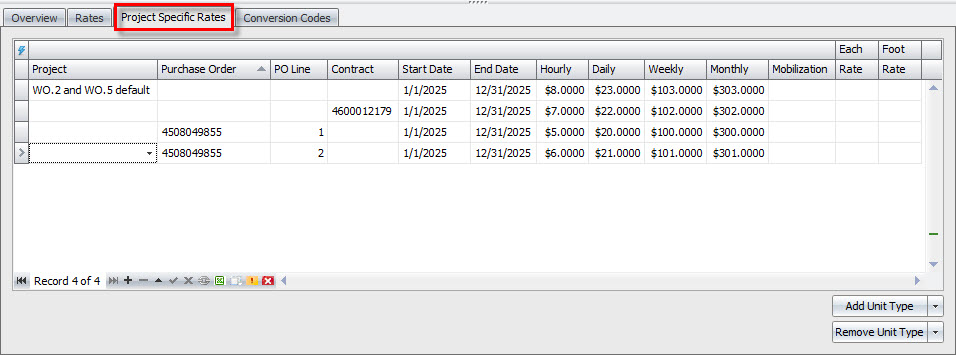
Project Specific Rates Tab
Project Specific Rates are generally agreed rates for specific projects and have similar principles for dates, like the charge rates. Once the project, purchase order, purchase order line number or contract are specified, the associated daily entries will use the assigned rates. You can set the rate for any combination of the available options. When only the project is filled, any WO that is assigned to that project is matched and used. When both PO and project are filled, if a PO has several work orders and one (or several) of the work orders is tied to a different project, then anything that does NOT match BOTH criteria (PO and project) will use the charge rate for the classification. Therefore, if you want the rate to apply to all work done on that PO, remove the Project so that only the PO is filled. Contracts may also be used to specify rates. Often times a single contract number could be assigned to multiple POs. By assigning rates to the contract number, subsequent POs that are issued to the contract, will be assigned the contract rates.
Conversion CodesTab
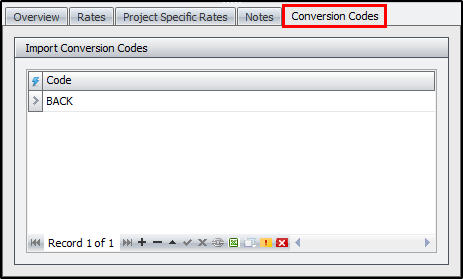
The “Conversion Codes” tab handles codes that can be used as a shortcut for the selected equipment on daily entry imports, etc. The codes can be alphabetic, numeric, or alpha-numeric, and each equipment can have more than one conversion code.
Importing Equipment Items
Equipment items can also be imported into CT3. Please be vigilant as this option can be easily confused with importing daily entry equipment timesheets.
To import equipment items click on Tools > Import > Equipment Items.

You can add a new preset if none is established for that company or edit an already established preset. You can also remove, duplicate, import or export presets if necessary.

The “Data Source” section lets you locate the directory path for your import file by clicking on the ellipsis. You can also choose which sheet number to import from and set the number of rows to skip to accommodate headers, etc. Upon saving the import preset, it displays the assigned file type in the title and allows update preset location to a file or folder for future imports.

The “Options” section affects how current and future imports affect each other.

The “Fields” section handles the underlying details of the import. Here you add the desired fields to import and assign the position to correlate with the column in your spreadsheet. Click the “Add field” dropdown to add a field and the remove button (red button to the right) to get rid of a field.
You can also set a different font case for each field.

Once the preset is prepared, click “OK” to save. From there click “Import” to import the data then review and confirm the import.