There is a grid in almost all screens in the software that displays data for the selected menu item. Each grid comes with default settings; however, you can modify them to suit your needs. This exercise describes the capabilities provided by the grid control, which represents data in a tabular form (similar to an excel spreadsheet with rows and columns), and supports data editing, sorting, grouping, filtering, summary calculation and many other features.
Before delving into each feature, it is important to note (using Labor > Employees to depict) 2 things:
(i) For the most part, each cell in the grid corresponds with a cell in the tabs below. For example: first name, last name, etc.
(ii) There are cases where a cell in the grid, corresponds with a different menu item, and as such the data in that cell is grayed out and cannot be modified in the current screen. For example: the rates cannot be altered in employee screen as they only display the values from the classification screen. An exception lies with adding “Override rates,” but even then it does not change the original value, but rather display the ‘placeholder’ value.
Data Editing
ADDING:
To add a record click the append button within the navigator control.
You can also click CLTR+PLUS KEY to generate a new row.
DELETING:
To delete a record click the delete button within the navigator control.
EDITING:
To edit a record select the cell and do one of the following:
(i) Click the edit button within the navigator control.
(ii) Press ENTER or F2.
(iii) Press any alpha-numeric key. The editor will be invoked and its contents will be replaced with the pressed character(s).
Additionally, if a cell editor provides a dropdown, you can activate the editor and open its dropdown by pressing ALT+DOWN ARROW or F4.
To accept changes to a record do one of the following:
(i) Click the End Edit button within the navigator control.
(ii) Press ENTER or click on another grid cell.
To discard changes to a record do one of the following:
(i) Click the Cancel Edit button within the navigator control.
(ii) Press ESC twice.
Data Presentation
SORTING:
To sort records by a column's values and replace existing sort conditions that are applied to the current or other columns, click the target column's header, until an upward triangle (ascending) or downward triangle (descending) icon is displayed within the header.
To sort records by a column's values while preserving existing sort conditions, do one of the following:
(i) Click a column header while holding down the SHIFT KEY, until an upward triangle or downward triangle icon is displayed within the header. This is especially useful when sorting multiple columns.
Notice that the originally sorted column (Classification) is treated as absolute while the subsequently sorted column (Last Name) is treated as relative – or as a subset of the absolute value. As a result, the last names for each classification are sorted in alphabetical order, without changing the order in which classifications are displayed.
(ii) Right-click a column header and select Sort Ascending or Sort Descending from the context menu that appears. This can be applied to one or more column headers.
To remove sorting by a column, do one of the following:
(i) Click the column header while holding down the CTRL key.
(ii) Right-click the column header and select Clear Sorting from the context menu.
GROUPING:
To group by a specific column, do one of the following:
(i) Right-click a column header and select Group By This Column from the context menu.
(ii) Drag a column header from the column header panel to the ‘group by’ box.
You can group by one or several headers and can also rearrange the grouping order by dragging and placing a header in a different position.
In the grid below, you can choose to expand or collapse the respective records by clicking the + and – buttons respectively.
Alternatively, you can right-click one of the grouped headers and select Full Expand or Full Collapse from the context menu to expand or collapse all the grouped data below.
Once the data is fully expanded it is recommendable to right-click a blank area in the ‘group by’ box and click Collapse to level from the context menu and specify the level you wish to collapse the data to. All preceding levels will remain expanded.
To ungroup data by a grouping column, do one of the following:
(i) Right-click a grouping column's header and select UnGroup from the context menu.
(ii) Drag a column header from the ‘group by’ box and place it back in in the column header panel. The arrows indicate where the selected column header will be placed.
To remove grouping by ALL columns, right-click the group panel and select Clear Grouping from the context menu.
Data Analysis
FILTERING:
Data can be filtered within the grid in several ways:
(i) Hover over the column header, click the filter button and select the desired value(s).
(ii) Type the filter in the Auto Filter Row and click on the condition to quickly choose what kind of filter you’re applying.
Please note that the headers with applied filters are displayed in blue. By default, if filtering is applied, the filter dropdown will only display the values which match the current filter criteria.
To set an advanced filter, right-click a column's header and select “Filter Editor” from the context menu.
Afterwards outline the conditions and groups and click OK.
The filter and its arguments will display below the grid, and can be further modified by clicking Edit Filter or removed by click the x button to the left of the displayed filter.
To clear the filter applied to a specific column right-click the column header and select “Clear Filter” from the context menu.
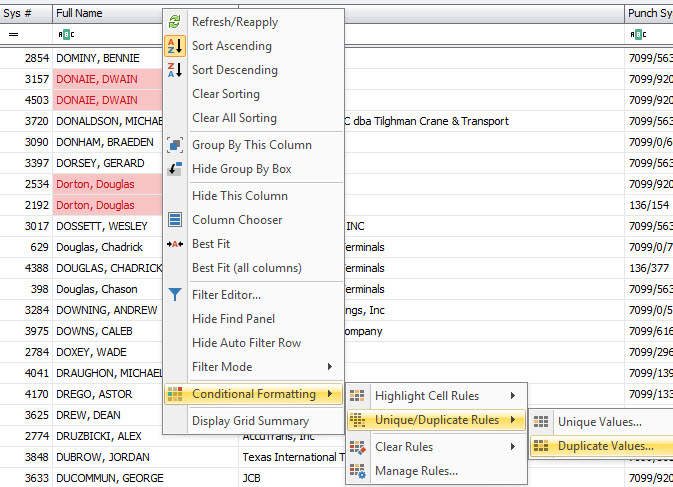
Like in excel, the program has conditional formatting, which can make it easier to analyze data. In this example the task is to indentify duplicate employee names, so that they can be merged. by right clicking in the column header, the menu below will appear.

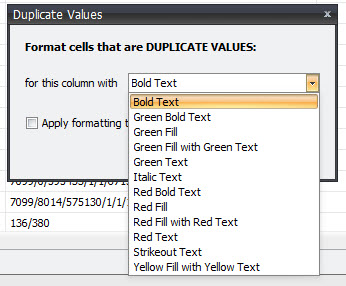
Once the mode is selected, you may choose how to display the data. In the examploe above, "red fill with red text" was selected.

To clear conditional formatting, click "clear rules" in the drop down/
Data Layout Customization
DISPLAYING HIDDEN COLUMNS:
A very useful tool in each grid is the Column Chooser, which basically houses the columns not displayed. To get the column chooser, right-click on a column header and select “Column Chooser" from the context menu.
From there, drag and place the column header from the Column Chooser customization form to the grid. The facing arrows indicate where the column header will be placed.
You can also search for the column header you wish to place in the grid using the search bar. Simply type the characters in the title and select from the filtered results.
Items not found are non-existent for that menu item.
HIDING COLUMNS:
To hide a column, do one of the following:
(i) Click its header and drag it onto the grid control's cell area, until the cursor changes its image to a big 'X'. Then release/drop the header.
(ii) Right-click the column header and select “Hide this Column” from the context menu.
(iii) Drag and drop the column header into the Column Chooser customization form if it's open.
REARRANGING COLUMNS:
To reorder columns, simply drag and place a column header in a new position.
NOTE: Each time the grid is modified, the customization is saved when that screen is closed (assuming the same screen is not opened multiple times). For example if the modification took place in the first screen (red arrow) and it was closed while the second screen (blue arrow) remained opened or active, then the applied customization(s) will NOT be saved as the second screen (blue arrow) was closed lastly, hence its settings being adopted.
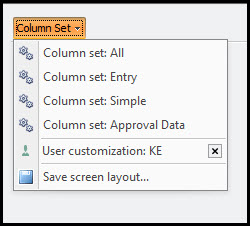
In the column set there is also the ability to save different layouts in each screen. These options are available in all analysis screens.

By clicking "save screen layout" you will have the ability to store it as a "user customization" where only your user will have access to the stored layout. You can also chose to save it in "site customizations" where all users would have access to the layout, and in cases were there are multiple sites, you can make it visible to other site by selecting "all-sites customizations"

RESIZING COLUMNS:
To resize columns, drag the right edge of the target column header and expand or contract it.
To change a column's width so that it displays its content compactly in their entirety, do one of the following:
(i) Double-click the right edge of the column header.
(ii) Right-click the column's header and select Best Fit.
Either action will automatically adjust the specified column.
To change the widths of all columns so that they display their contents in the best possible way, do one of the following:
(i) Double-click the lightening icon above the row indicator.
(ii) Right-click any column's header and select Best Fit (all columns).
Either action will automatically adjust the columns in the grid.
