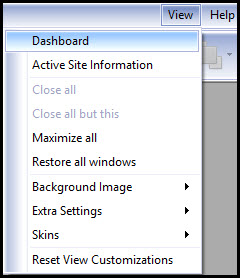
The dashboard is the first screen that loads when you log in to the CT3, however, you can also get to it by clicking View > Dashboard.
This interface basically provides a brief overview of the process and audit activities and lets you monitor the statuses of the daily entries and approval processing.
The “Filter” box defines what records are loaded and displayed on the dashboard.
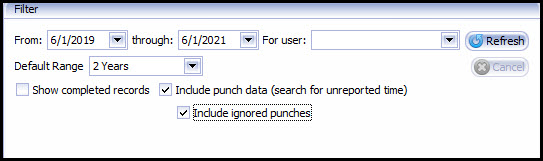
You can specify a date range using (both or one of) the “from” and “through” date dropdowns. This example will load all records from June 1, 2019 through June 1, 2021. By default the dashboard loads daily entries for the last 6 months at the beginning of that month (i.e. if the dashboard is loaded in July 2016, it will load records from January 1, 2016). However users have the ability to set their desired default range at 3, 6, or 9 months or 1 or 2 years.
The “For user” dropdown lets you load:
- Records assigned to each user,
- Unassigned records, or
- Records for all users.
By default, the dashboard will automatically load records for the user that is currently logged in.
Tick the “Show completed records” checkbox (unchecked by default) to load records that have been included in an billing package. Tick the “Include punch data” checkbox to load punch records for employees with no affiliated labor entries. Tick the "Include ignored punches" checkbox to view punch records that have been marked as "ignored".
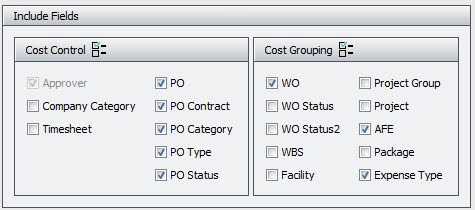
The “Include Fields” box lets you select which pivot grids to load and use below, to analyze the data. To avoid more resource-intensive queries on the dashboard, it will remember what fields you selected and load them in the future.
PLEASE NOTE: Records DO NOT load automatically after making selection/changes on the dashboard. Therefore, after making selection/changes, click the blue “refresh” button in the “Filter” box to load the records that satisfy the specified condition(s).
The main section of the dashboard provides an at-a-glance view of the daily entries but also has in-depth capabilities embedded in the pivot grids and record dropdowns. It has a sequential layout format and is equipped with drag-and-place pivot grids that enable users to see different views of the data, similar to Microsoft Excel pivot tables.
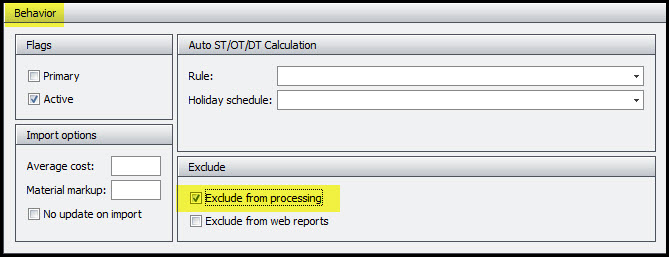
To exclude a company from the dashboard, go to the Companies screen (General > Companies) and tick the “Exclude from processing” checkbox.
Exploring Pivot Grids
The following list includes some of the frequently used functionalities embedded within each pivot grid.
When you hover over a pivot grid, you can filter its underlying records by clicking on the funnel icon in the upper right corner.

When you click on a pivot grid itself, you can sort its records in alphabetical or chronological order. The upward triangles indicate ascending order while the downward triangles indicate descending order.

When you right-click a pivot grid you can perform several tasks.

Here you can reload its underlying data, use the ‘best fit’ option to adjust column margins, or even re-position the pivot grid, relative to other grids. You can also drag and place pivot grids to rearrange them.
Right-clicking pivot grids with dates will give you additional, date-specific options to select.

When you right-click an underlying record of a pivot grid you can choose which level to expand or collapse that record or all records that are subsets of the pivot grid. For example, if you right click a company name, you can choose to expand/collapse the data for that company or expand/collapse the data for all companies.

Additionally, when you right-click a record grouped as row you get to sort the analyzed columns by the selected row (image above) and when you right-click a record grouped as column you get to sort the analyzed rows by the selected column (image below).

Once the sorted row/column is collapsed, it will have two facing triangles indicating that records are being sorted by ‘this row’ or ‘this column’. You can right-click to sort further or remove all sorting.

To add a pivot grid to the analyzed data just drag and place it in the spot indicated by the two facing arrows.

To remove a pivot grid from the analyzed data just drag and place it in the area where they are housed.

It is also important to note that filters can be applied to any pivot grid, whether it is among the grids used to analyze the data or it is in the area where it is housed. For example, even though “Source” is not among the grids below, you can still limit the data to only show labor records.

Pivot grids with filtered records will have the funnel icon display. Use the “Clear filters” button to remove all applied filters.

When moving pivot grids around you will observe that:
(i) Some grids can ONLY be grouped as rows, and not as columns (i.e. date).

(ii) Some grids can ONLY be grouped as columns, and not as rows (i.e. Status).

Exploring Each Tier of Activity
The Dashboard provides a running summary of your activities in a simple grid view. Daily entries can be analyzed and processed in each tier, after which the records will move (forward or backward), to the next tier.
It is important to note that dropdowns for the daily entries are ‘grouped’ based on what level each row is expanded or collapsed. For example, if all companies are collapsed and you click the dropdown and mark the records audited, all the records for the company will be affected regardless of the underlying details (week ending, cost type, PO, etc.) of each record.
Let us explore each in greater detail, expanding to week ending and treat each set of records as activities performed in a work week.
Punched Employees without Labor Entries
Since the “Include punch data” checkbox above was ticked, the first tier shows punch records for employees with no affiliated labor entries.

Clicking on the records’ dropdown lets you view the punch report or ignore these records on the dashboard. If you choose to ignore the records on the dashboard, you will get a confirmation message asking you to ratify omission and showing what details will be omitted.

Once labor entries are added for these punch records, they will move to “To-do”.
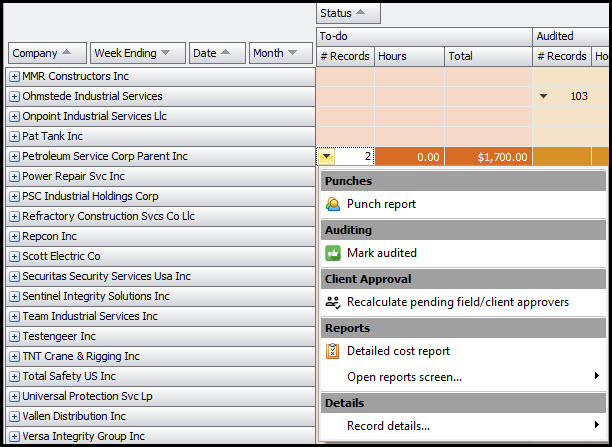
To-do
The “To-do” column handles daily entries that are not yet audited. The items are generally imported, or added via the hand entry or analysis screens.
Clicking on the records’ dropdown lets you perform several tasks.
Here you can:
- View punch report and scrutinize dates and hours for labor entry records.
- Mark the records ‘audited’ to move them to the “Audited”
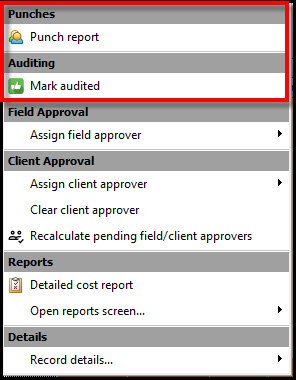
- Perform approval assignment activities. This section includes options to assign both field and client approvers to the selected records, clear an assigned approver, and recalculate approver assignment based on some predefined rules.
- Run reports on the selected records. This section includes options run several reports found in the “Reports”

- Scrutinize record details. This option takes you to the analysis screens for each cost type.

PLEASE NOTE: Most of the items in the records’ dropdown are similar for almost all tiers, with the exception of the items at the top (highlighted by the red rectangle).
Audited
The “Audited” column is where records are moved once you have compared what was reported to the punch report for any discrepancies or over reporting and verified the data in the detailed cost report. Here you’re verifying the accuracy of the records and sending them in a detailed cost report to the contractor for thier review and acceptance.

If an approver is NOT assigned, when these records are marked ‘verified’ they will move to “Verified” and will not move further until an approver is assigned. However, if an approver is assigned, when they’re marked ‘verified’ they will move to “Pending (Online)” instead, and will not move further until they’re approved. Conversely, if the records are instead marked ‘un-audited’ they will move back to “To-do” until further actions are taken.
Verified
The “Verified” column handles daily entries that are audited and accepted by the contractor but not yet assigned to an approver.
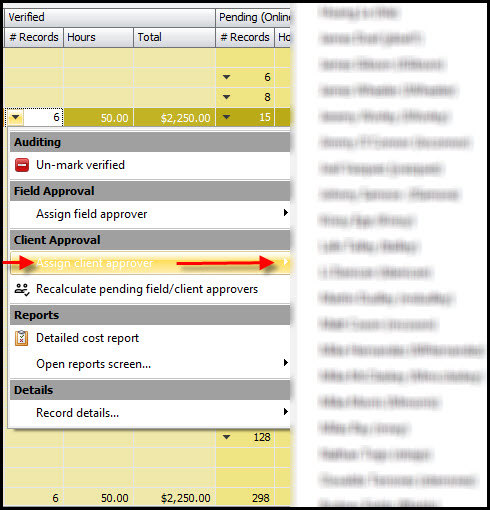
When these records are assigned to an approver they will move to “Pending (Online)” until they’re approved. However, if they’re instead marked ‘un-verified’ they will move back to “Audited” until further actions are taken.
Pending (Online)
The “Pending (Online)” column handles daily entries that have been submitted for approval but not yet approved. The records are accessed on the processing.costrack.com website, where approver queue's are housed.

When these records are approved, they will move to “Approved (Online)”. You must always refresh the Dashboard before the move takes effect. If you clear the approver at this stage the records will move back to “Verified”. However, if they’re instead marked ‘un-verified’ they will move back to “Audited” until further actions are taken.
PLEASE NOTE: Depending on what action(s) the approver takes, the records can move forward to one of three possible tiers: “Approved (Online)”, “Passed (Online)” or “Denied (Online)”. Each tier will be explored below.
Approved (Online)
The “Approved (Online)” column handles daily entries that have been approved but are not yet part of a billing package.

At this stage, clearing approvals will require confirmation as the records are already approved online by the assigned approver.
When you clear approvals, the records will move back to “Pending (Online)” and must be approved again before they move forward.

When you clear approvals and reassign the records to another approver they will also move back to “Pending (Online)” and must be approved again before they can move forward.
When you clear approvals and mark the records ‘un-verified’ they will move back to “Audited”.

Dropdown items for “Approved (Online)”, “Passed (Online)” and “Denied (Online)” are the same.
When creating a billing package, the records will be closed and moved to “Billing”. Upon clicking “Create billing package(s)” a pop up screen will load with all the details of the billing package. Once the package is successfully created you will receive a confirmation message stating that an authorization package and a billing package was created.

PLEASE NOTE: Creating billing packages from approved records automatically creates an authorization package for the selected records. Additionally, the "Create Billing Package(s)" button is ONLY available when both a company and date range or date pivot row is available. As such, if the records are collapsed to the company level (highlighted earlier in the introductory paragraph for exploring each tier of activity) then a billing package cannot be created.
Passed (Online)
The “Passed (Online)” column is where records move to when they have been marked to pass to another approver. In the approval notes, stored on the records, the original approver can leave a comment with who to pass the records to for approval.

Denied (Online)
The “Denied (Online)” column is where records that have been denied by the approver move to. In the approval notes, stored on the records, the original approver should leave a comment explaining what is wrong with the charges so that you can communicate that back to the contractor for corrections or removal.

Billing
The “Billing” column handles daily entries that form part of a created (authorization package and) billing package. These records have not yet been marked as printed.

The next step is to print the created billing package at Daily Entries > Packaging > Billing.
After the report is packaged, marked closed, and printed the records are only available for reports, unless the billing package and accompanying authorization package are revoked. They will then move to the “Billed” column. For these records to display on the Dashboard after they’re closed the “show completed records” checkbox must be ticked. Otherwise they will remain concealed.
This concludes the different tiers of activities on the Dashboard.