The purchase order screen serves as a platform to manage and track purchase orders. In this article, we will explore different functionalities within the purchase order screen.
This screen is one of several screens that can be pre-filtered, to limit what data is loaded. For example, if you only want to load active POs for a given company:
Click the filter icon…
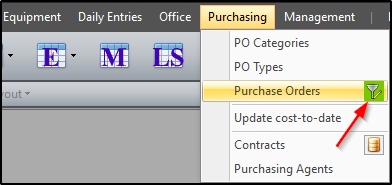
…filter for the company and load the satisfying records.
Otherwise, you can load all records, and then filter afterwards.
Adding Purchase Orders
To add a purchase order, click on Purchasing > Purchase Orders.
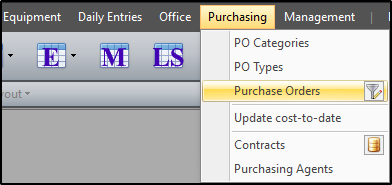
Click append (+) to add a new row, then enter the details for each record. You can also use the buttons to the right of the append button to modify or delete the selected record(s).
After adding a new row, enter the details for each record in the grid or in the tabs below the grid. You will observe that some columns in the grid are grayed out, as they're read-only and cannot be modified there. In this example, the "Amount" and "Cost to date" columns are grayed out as they represent the cumulative value of the PO lines on each PO and the total charges on each PO line respectively. Also note the filter icon to the right of the grid (to be explore further, below).
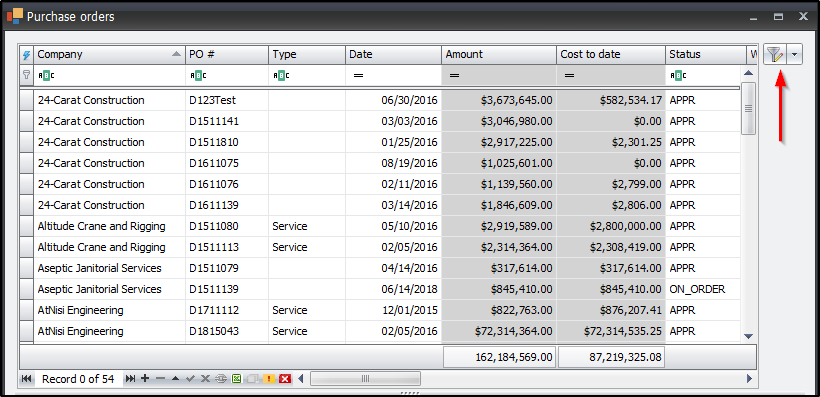
After adding and editing records, click on “Save” to accept changes as the data is not automatically saved after records are added, modified or deleted.
Data Grid
The data grid allows changing several values for records simultaneously. After selecting the desired records, make the change in one of the selected cells then press tab and that change will take effect for all select records in that column.
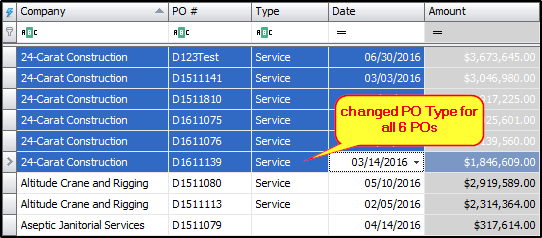
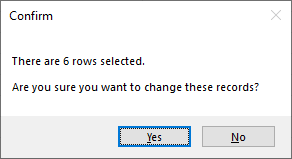
You will be prompted to confirm changes that affect more than five (5) records at a time.
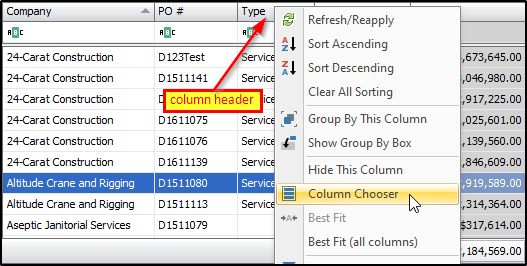
Some columns in the grid may not be visible, but can be retrieved from the column chooser, which basically houses the hidden columns. To retrieve a hidden column, right-click a column header and select "Column Chooser" from the context menu.
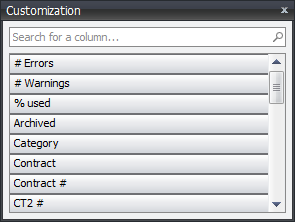
This will open the "Customization" form with the list of available columns for that screen.
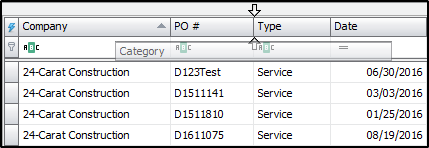
Afterwards, drag and place the desired column from the form, to the grid. The two arrows facing each other indicate where the column header will be placed in the grid.
Let's now explore the tabs below the grid.
Filtering Purchase Orders
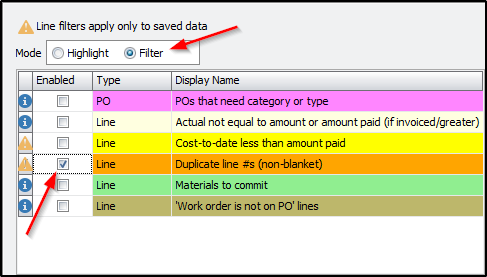
The filter button (upper right corner) lets you highlight or filter live purchase order data that satisfies a prescribed condition. If you choose to highlight the results, then all POs will remain in the grid, with the results highlighted based on the condition(s) selected. Alternately, if you choose to filter the results, then only the POs that satisfy the condition will remain in the grid. To set a condition, just flag the checkbox in the "Enabled" column and the results will be highlighted or filtered.
You can also filter PO lines below, and doing so will only show POs with lines that match the filter criteria. It will also show other lines on the PO that do not match. When line filters are set, you must click "Apply" to get the filter(s) to function, and "Clear" to remove the filter(s).
You will observe in the "Type" column that all but one (1) of the listed conditions apply to PO lines. As such, you can click on the "Lines" tab below, to view the PO lines that are affected. For example, if you filter for POs with duplicate line numbers...
...you can select the PO record in the grid then click on the "Lines" tab and see what line numbers are duplicated.
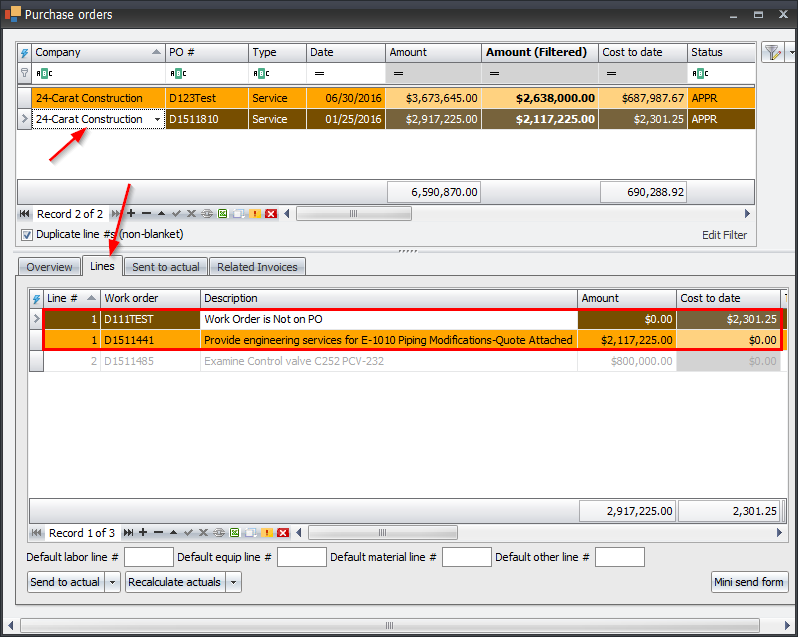
In this example, daily entries for purchase order D1511810 and work order D111TEST had the wrong PO/WO combination, hence the note "Work Order is Not on PO". That is also a condition that can be filtered for, above. Additionally, line 2 is grayed out, since it is on the PO but does not match the filter (it's not a duplicated line). This issue could be resolved in one of several ways:
(i) You could add the WO to a PO line, then change the line # in the daily entries.
(ii) You could change to PO or the WO on the daily entries to accurately reflect a correct PO/WO combination (i.e. change the WO from D111TEST to D1511441).
The purchase order filter is a great tool that can be used to quickly pinpoint anomailies and tidy up the PO table. Let's move on to the “Overview” tab.
Overview Tab
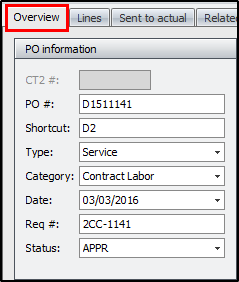
The “Overview” tab has five (5) sections and contains supplementary details for each PO. The "PO information" section handles distinct values of each purchase order. It includes a CT2 # which is is a read-only field that stores values transferred in a CT2 to CT3 database migration. The PO # is the the purchase order code that has been added or imported from an external source. You can add a shortcut, to use in place of the PO # for daily entries, and timesheet imports, etc. The type and category serve as utilities to group POs and make it easier to report on several POs that have similar types and categories assigned. The date tells when the PO was created while the req # is for tracking the PO requisition number from the client accounting system. The status tells where things stand with the purchase order and indicates whether the PO is approved, closed, etc.
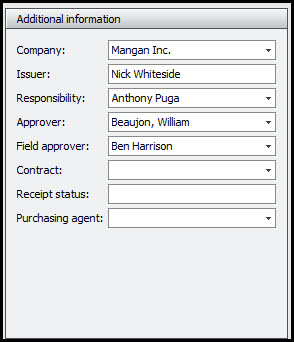
The additional information section handles PO assignments and outlines the responsible parties for the selected PO. This section includes a company field, denoting which company owns the PO. It also tells the issuer, who created the PO and the responsibility is the individual that approves charges on the PO. The approver is an additional field to assign an approver when someone other than the responsibility should approve the charges. The field approver is utilized when there are two levels of approvals needed. This individual verifies the workers and equipment usage is valid for the dates reported, they do not have access to any financial information. The issuer and purchasing agent fields are similar and can be used interchangeably. All of these fields are populated from the Responsibilites table. The contract is to track the agreement between the client and the contractor/company. Generally, multiple purchase orders can be made underneath one contract, and contracts are edited/viewed on Purchasing > Contracts. The receipt status is used to hold a status from the client accounting system for whether all lines have been delivered, received, and/or invoiced.
The description illustrates the task(s) to be performed, or tells what the charges to the PO relate to.

The "Option" section lets you set diffrent flag on the PO. Here you can flag whether or not the selected PO is a blanket PO. Blanket POs are used when the lines on the PO are not work order-specific, so that multiple WOs can be charged against lines (this is sometimes called a universal PO). You can also set whether the PO is active or inactive. POs that are closed/completed are generally marked inactive.
You can also control how certain details on the PO get updated by imports. In this case, if you flag the no import update checkbox then existing lines on the PO will not be modified during import, but new lines may be added. Similarly, if you flag the no company update checkbox then the company drop-down will not be modified during import.

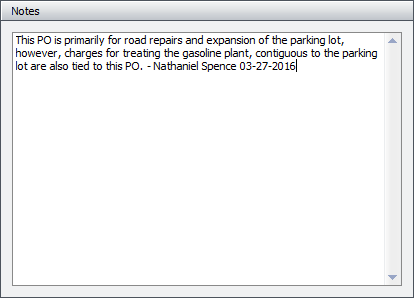
The "Notes" section serves as a medium to add notes to the PO that are not generally found in the PO description.
Lines Tab
The “Lines” tab is basically an assembly of the PO lines that provides details work orders, line amounts, cost to date, projects, etc., that are tied to the PO. Additionally, you can set default line numbers for labor, equipment, material, and other charges, respectively. When this is done, daily entries for each cost type will be assigned to their respective line number upon import (if no line # is specified).
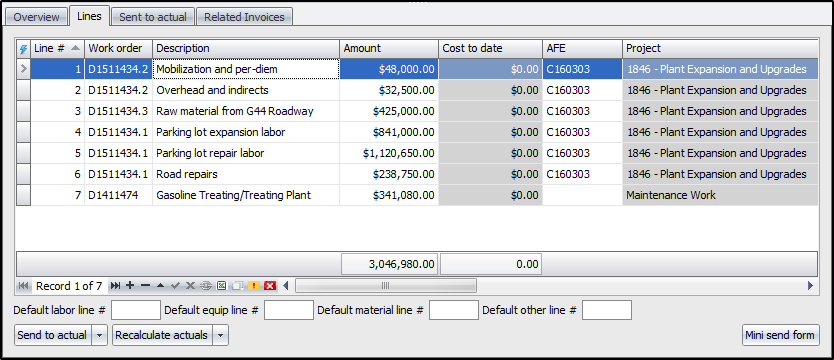
The three buttons at the bottom of this tab are used to send costs to actual and recalculate the costs sent to actual on the PO and PO lines. The Send to actual dropdown lets you send costs to actual, which is basically saying the amount sent has been incurred, the Recalculate actuals dropdown lets you update sent amounts to new amounts and the mini send form is similar to the send to actual dropdown, but remains on screen while you explore other POs and PO lines. As such we will explore the mini send form and the recalculate actuals dropdown below.
Mini Send Form
When you click the mini send form, it opens a small pop-up screen with the options to send charges to actual for the PO or PO line(s). Here you can click in either of the grids (PO/PO line) or use the up/down arrows on your keyboard to jump from one item to another. If you flag the 'lock' checkbox, it will lock in the set variables in the pop-up screen (send date, type, etc.), while you browse between POs and PO lines. The send date is the effective date when the actuals will be posted. By default, this is the date the PO was created, but can be changed to a different one. The percent will determine what fraction of the PO or line amount will be sent to actual, while the type tells the effective cost type for the amount sent to actual.
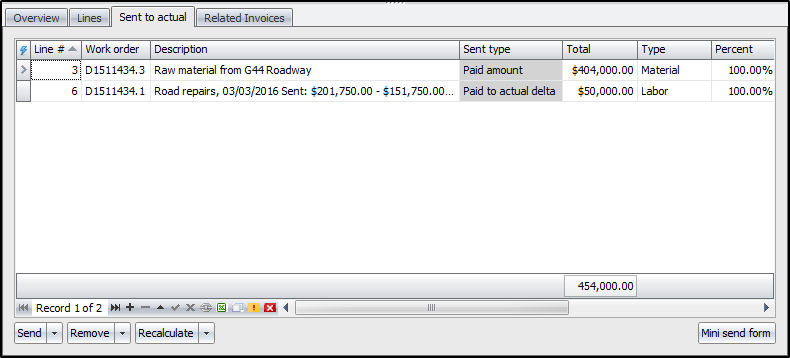
The send box has 4 options that will ultimately determine what values will be sent to actual. If you select PO amount it will send the cumulative amount for all the PO lines (i.e. 3,046,980.00) to actual. If you select Paid amount it will send the paid amount on the selected line (i.e. line 3: 404,000.00) to actual. If you select Paid to actual delta it will send the amount paid less the cost to date (i.e. line 6: 50,000.00 or 201,750 - 151,750). The two (2) examples will be used in the sent to actual section below. If you select Effective amount, if the PO is invoiced or the amount paid is greater than the PO amount, it will send the amount paid to actual. Otherwise it will send the amount instead.
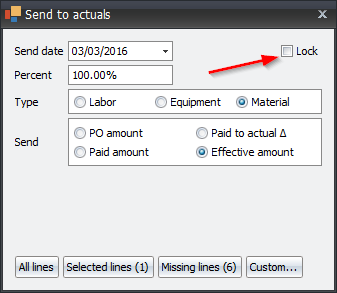
The four (4) buttons at the buttom of the form determine what lines are affected. You can choose to send actuals for all lines on the PO, or just the selected line(s). You can also send actuals for the missing line(s) which is basically the lines that are not (or not yet) sent to actual. Lastly you can use the custom settings to do a modified send to actual. Let's give it a closer look.
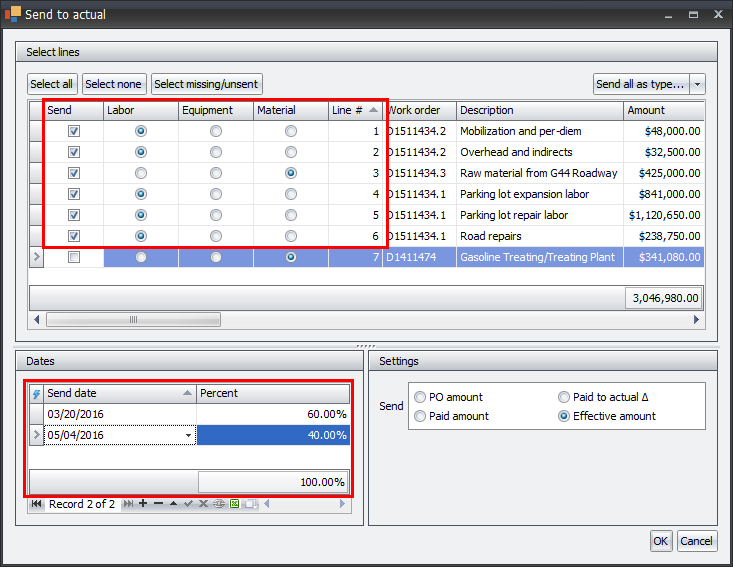
Custom
The custom settings lets you combine multiple dates, cost types, PO lines, etc., at once when sending values to actual. In this (highly unlikely) example, 60% of the selected lines will be sent on March 20, 2016, while the remain 40% will be sent on May 4, 2016. Also observe that one line is left untouched and the lines that are sent have various cost types selected.
Recalculate Actuals
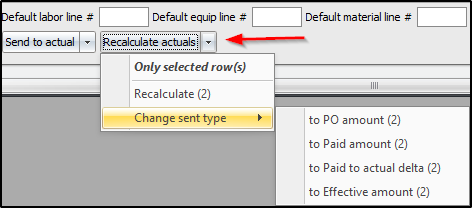
The recalculate actuals button lets you recalculate values that were sent to actual. After you click the dropdown, choose only selected row(s) if you only want to recalculate the selected rows. If you want to recalculate based on how they were originally sent to actual, just click "Recalculate." You can also click Change sent type and change the type for all the rows that were sent to actual. You will see a count beside option to indicate the number of rows that have been sent and/or will be affected.
Let's now explore the sent to actual tab.
Sent to Actual Tab
The sent to actual tab handles values for the POs and/or the PO lines that have been sent to actual. It includes details for the PO line #s, sent type, cost type and total amounts sent to actual, to name a few. You have the same options to send and recalculate actuals as from the lines tab. The remove button lets you take away all actuals or the selected actuals form the list.
Related Invoices Tab
**********************The related invoices tab stores invoice that are submitted for charges to the PO. Waiting on ticket: https://costrack.atlassian.net/browse/COS-2386
Importing Purchase Orders
Purchase orders can also be imported into CT3. This is the preferred method when adding POs in bulk or just adding several POs simultaneously.
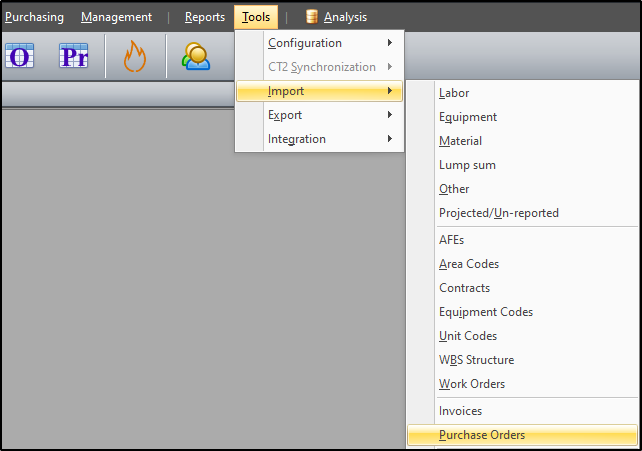
To import purchase orders, click on Tools > Import > Purchase Orders.
You can add a new preset if none is established for that company or edit an already established preset. You can also remove, duplicate, import or export presets if necessary.

The “Data Source” section lets you set the directory for your import file by clicking on the ellipsis. You can also set sheet number to import from and set the number of rows to skip to accommodate headers, etc. Upon saving the import preset, it displays the assigned file type in the title and allows update preset location to a file or folder for future imports.

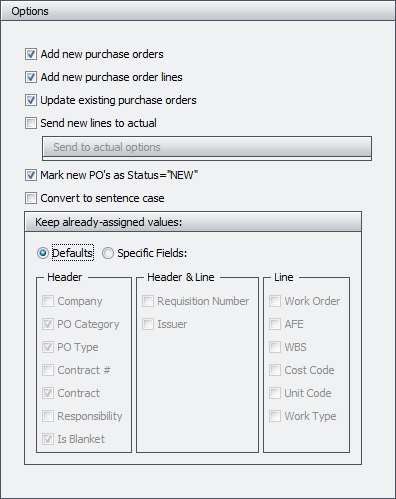
The “Options” section affects how current and future imports affect each other and also determine how new PO lines and assigned values are treated.
The “Fields” section handles the underlying details of the import. Here you add the desired fields to import and assign the position to correlate with the column in your spreadsheet. Click the “Add field” dropdown to add a field and the remove button (red button to the right) to get rid of a field.
You can also set a different font case for each field.
Once the preset is prepared, click “OK” to save. From there click “Import” to import the data then review and confirm the import.