Updating CT3
Starting the update
There are several of ways to update CosTracker3 and each option should give you the same result. Before updating, check with your IT team or lead to sure it won't effect your site negatively.
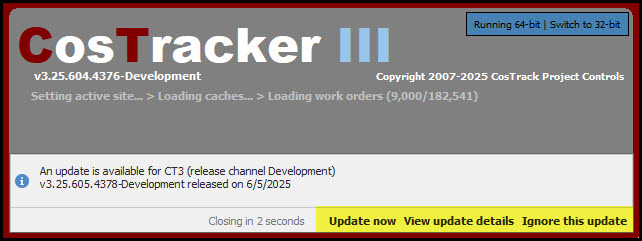
1. You will be prompted at log in anytime there is an update available for use. After you enter your credentials, you will have the following options:
A. Update now - Which will open the updater window.
B. View update details - This will show you what change(s) have been applied to the next version of the software.
C. Ignore this update - You will no longer receive notifications about the current update.
2. Once logged in, click Help > Check for Updates then 'next' through the steps.
3. From your desktop/taskbar, right-click the CT3 icon, then right-click CosTracker3 and click Properties.
Afterwards, click on Open File Location on the “Shortcut” tab. This should take you to the precise installation folder.
Lastly, run "UpdateCheck.exe"
DO NOT alter or delete any other files in the folder.
4. Browse to C:\Program Files\CosTracker3 and run "UpdateCheck.exe" (similar to the preceding option)
5. You can also browse to C:\Program Files\CosTracker3 and unzip the files from the updated folder to replace current files with the updated version.
Updater
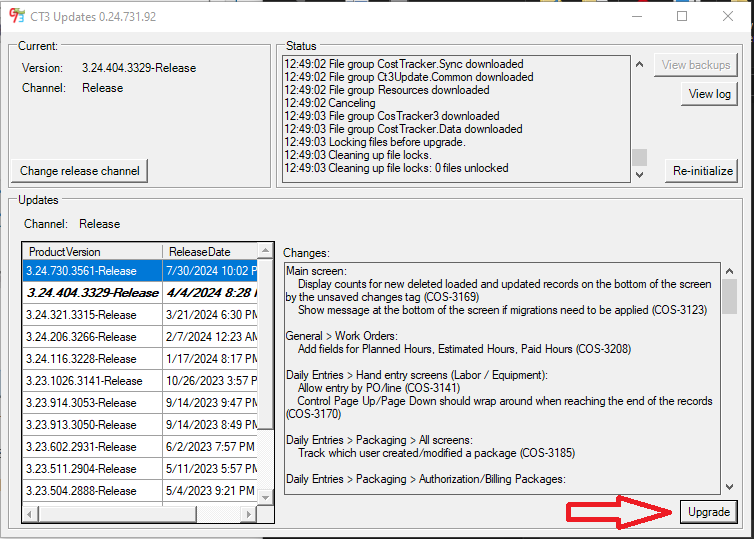
If using options 2-4 listed above the CT3 Updater will open. This tool allows the user to select what version of the software they wish to be using. There are three areas to be aware of on this screen, the "Change release channel" button, the Upgrade/Downgrade button, and the product version grid. Upon initially opening this the Updater will be set to the Release channel. This channel is where our main software releases are stored, these releases contain several bug fixes/improvements/additional features each and are gathered into one spot for ease of use following testing these changes.
Channel Selection
Most users will not need to change channel from the release version but occasionally there may be a need if a certain feature is needed. If this is not applicable please skip to the next section. Before changing the channel please reach out to your lead, IT team, and CosTrack support (This email address is being protected from spambots. You need JavaScript enabled to view it.) before doing this as you may be using experiemental features that are not fully ready for use. If you do need to change the channel press the button noted with a red arrow below.
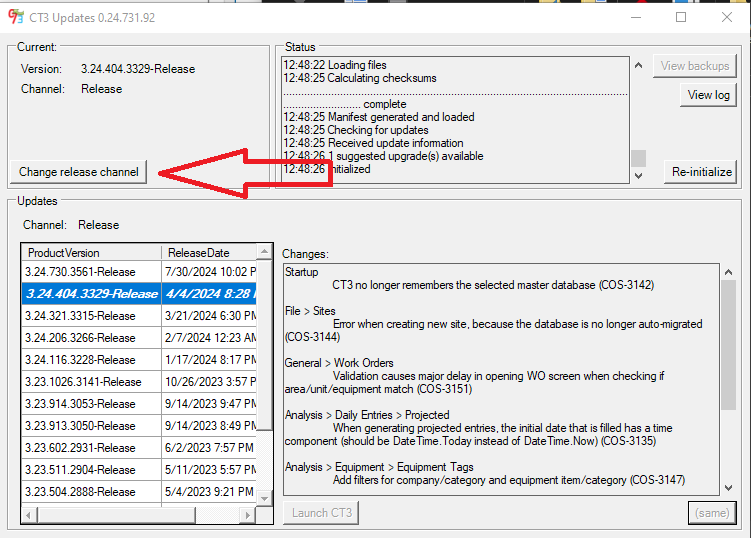
This will open the Select release channel where you can then select from the Release branch, the Developement branch, or a distict feature branch. After pressing OK on the channel you wish to use you will be returned to the previous screen and can proceed with the upgrade steps in the next section.
Upgrading
To start the upgrade, select the version of the software you wish to upgrade to in the Version Grid on the left of the screen. These are sorted chronologically with the most recent update at the top. For most cases this will be selecting the top option in the grid. The user should then click the Upgrade botton (marked with a red arrow in the image bellow). Be sure to close CT3 before pressing this button as upgrading will change files used by the software and these cannot be modified while the program is in use.
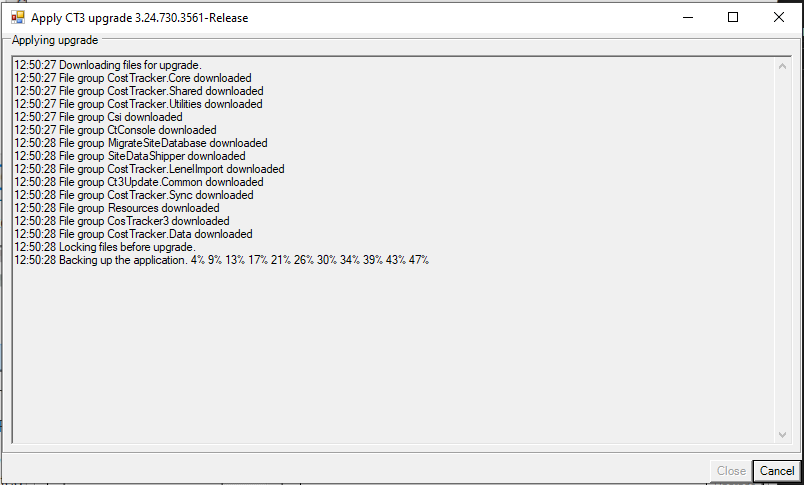
The updater will download the new files and back up the existing software and then update the files. Once this completes you will be returned to the main screen of the Updater. You can then close the Updater and reopen CT3.
Errors Upgrading
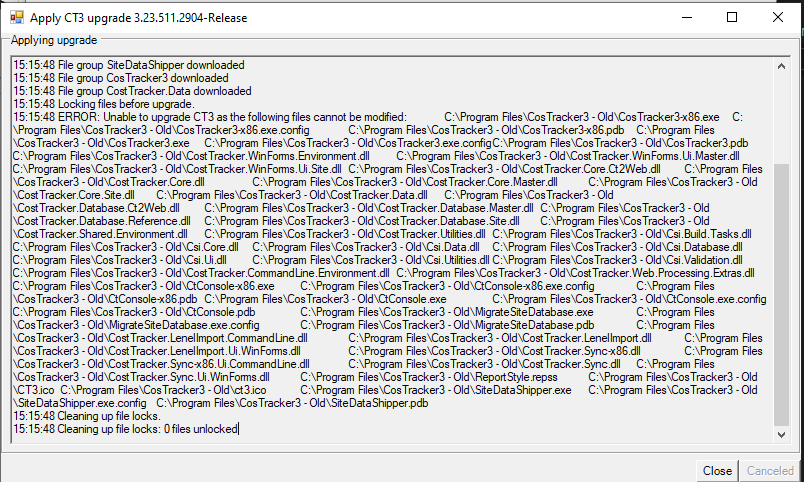
It is important that you close all CT3 program windows that you have open. If you leave one open, you will receive this error:

If the "Applying upgrade" fails in the way shown below please follow steps 2 or 3 in the "Starting the Update" section above to locate the CT3 updater in your program files.
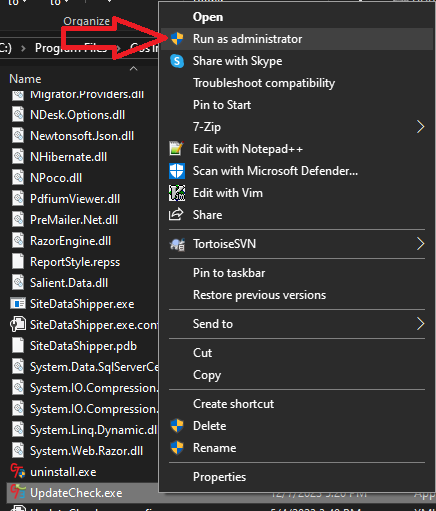
Next right click UpdateCheck.exe and select "Run as administator" and yes on the following Windows prompt. Then please retry the update following the same steps as above. If errors persist please reach out to your IT team and CosTrack support (This email address is being protected from spambots. You need JavaScript enabled to view it.) for help.
Downgrading
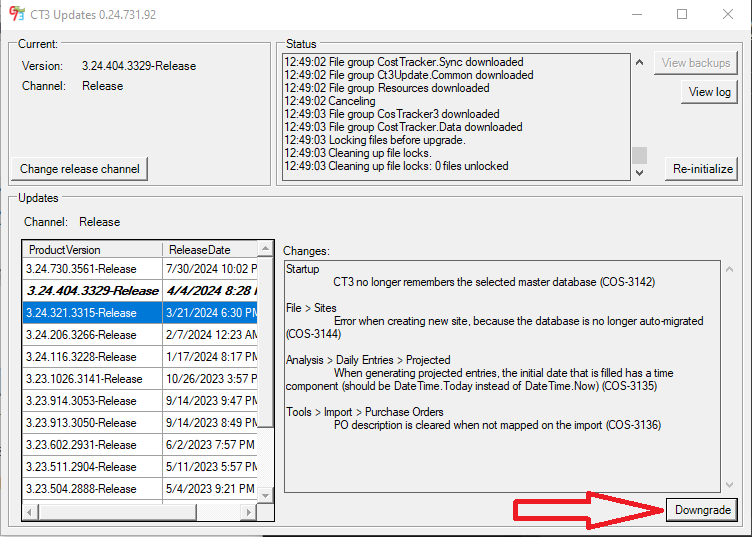
If at anytime you need to downgrade the software or should you run into an error that prevents you from using CT3 you can downgrade the software using similar steps to how you would upgrade. Using the Version grid select the previous version (or older) from what you are currently on, shown in bold text, then press the Downgrade button (noted by a red arrow in the image below). Please be sure to close CT3 when downgrading. After the downgrade completes, you can reopen CT3.
Migrating CT3
Following an update there may be database migrations that need to be run in order for the software to run correctly. If the Active User/Site panel on the left side of the screen looks like the below, or there is no notification in the bottom right side of the screen then you may skip this.
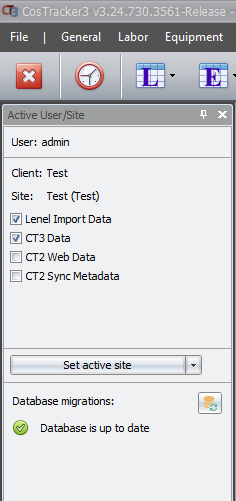
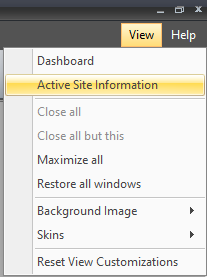
If you need to see the Active User/Site panel and it is not visible, go to View > Active Site Information or look for a pin icon on the left of your screen and mouse over it.
.
To know if you have migrations available, look at the bottom right corner of the screen for a yellow box that says "DB Migration(s) Available" or else to the "Active User/Site" pannel on the left side in the Database Migrations section will have a list of items and look like the second image below.
You should check with your IT team or lead before running migrations. If you want to apply the migrations, press the apply button noted by a red arrow shown above. This will open a screen to confirm you are ready to apply the migrations, press "Yes" if you are. Your Data migrations section of the Active User/Site panel should now look like the first image of this section. If you have any issues please reach out to your IT team and CosTrack support (This email address is being protected from spambots. You need JavaScript enabled to view it.) for help.


